
Cleaning a snow blower carburetor is essential for its performance. A clogged carburetor can cause many issues.
Keeping your snow blower in top shape ensures smooth operation during winter. The carburetor plays a crucial role in mixing air and fuel. Over time, dirt and debris can clog it, affecting performance. In this guide, you will learn how to clean your snow blower carburetor step-by-step.
This process can save you time and money on repairs. Plus, it ensures your snow blower is ready when you need it most. So, let’s dive in and get your machine running like new again!
Tools And Materials Needed
Cleaning your snow blower carburetor is crucial. It ensures smooth operation during snowy months. To do this task properly, you need the right tools and materials. The following sections will guide you on what you need for the job.
Essential Tools
Having the right tools makes the cleaning process easier. You will need a socket wrench set to remove the carburetor. A screwdriver set is essential for loosening screws. Needle-nose pliers help with handling small parts. A clean cloth is necessary for wiping down components.
Cleaning Solutions
Effective cleaning solutions are crucial for removing dirt and grime. Use a carburetor cleaner spray. It dissolves deposits and ensures smooth functioning. A small brush helps in scrubbing hard-to-reach areas. Soapy water can also be used for initial cleaning.

Preparation
Before you start cleaning your snow blower carburetor, proper preparation is key. This ensures safety and efficiency throughout the process. Follow these steps to get ready.
Safety Precautions
First, prioritize your safety. Wear protective gear such as gloves and safety glasses. Ensure the snow blower is on a flat, stable surface.
Avoid working indoors to prevent inhaling fumes. Adequate ventilation is important.
Gather all necessary tools and materials. This includes wrenches, screwdrivers, and a clean rag.
Disconnecting The Spark Plug
Next, disconnect the spark plug. This step is crucial to prevent accidental starts.
Locate the spark plug wire and gently pull it off. Use a spark plug wrench if needed.
Keep the wire away from the plug. This ensures the engine stays off during cleaning.
Accessing The Carburetor
To clean your snow blower carburetor, you need to access it first. This process involves removing certain parts of your machine. It might seem tricky, but with the right steps, it becomes straightforward. Below are the steps to help you access the carburetor.
Removing The Cover
First, ensure your snow blower is off and the engine is cool. Safety is a priority. Locate the cover that protects the engine and the carburetor.
To remove the cover, you usually need to unscrew a few bolts. Use a screwdriver or a wrench, depending on the bolt type. Keep the bolts in a safe place to avoid losing them.
After removing the bolts, gently lift the cover. You might need to wiggle it a bit if it’s stuck. Once the cover is off, you will see the engine and other components.
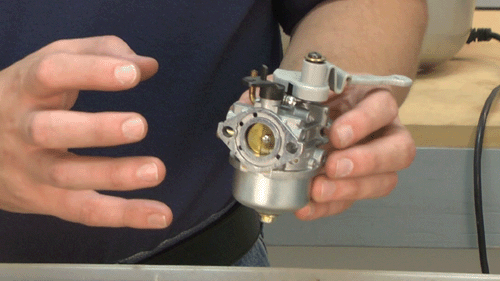
Locating The Carburetor
With the cover removed, you need to find the carburetor. The carburetor is usually on the side or top of the engine. It is a small part with several connections, including fuel lines and air filters.
Look for a part that has a bowl-shaped bottom. This is where the carburetor stores fuel. You might also see a few screws that adjust the carburetor settings. Identifying these parts helps you understand where to focus your cleaning efforts.
Once you locate the carburetor, you are ready to start the cleaning process. Remember to work carefully to avoid damaging any components.
Disassembling The Carburetor
Disassembling the carburetor is a crucial step in cleaning your snow blower. It may seem daunting, but with some patience, you can do it. Begin by ensuring that you have all the necessary tools. Work in a clean, well-lit area.
Detaching Fuel Lines
First, locate the fuel lines connected to the carburetor. These lines carry fuel from the tank to the carburetor. Use pliers to gently detach the fuel lines. Be careful, as fuel may spill. Catch any fuel in a container to avoid mess.
Once detached, inspect the fuel lines for cracks or wear. Replace any damaged lines. This ensures smooth fuel flow after reassembly.
Taking Apart The Carburetor
Next, remove the carburetor from the snow blower. Use a screwdriver to unscrew the bolts holding it in place. Keep these bolts safe for reassembly. Gently pull the carburetor away from the engine.
Place the carburetor on a clean surface. Carefully disassemble it by removing the float bowl. This part holds the fuel inside the carburetor. Use a wrench to loosen the screw, then lift the bowl off.
Inside, you will see the float and needle valve. Remove these parts gently. Clean them with a carburetor cleaner spray. Ensure all small openings are clear of debris. Reassemble the parts once clean.
Cleaning The Carburetor
To keep your snow blower running smoothly, it’s important to clean the carburetor. A clean carburetor ensures that your machine gets the right fuel and air mixture. This helps it run efficiently and prevents problems during heavy snowfall.
Cleaning Jets And Passages
The jets and passages in the carburetor can get clogged with dirt and debris. This can cause the engine to run poorly or not start at all. Follow these steps to clean them:
- Remove the carburetor from the engine. Refer to your manual for guidance.
- Disassemble the carburetor by removing the float bowl and other parts.
- Use a small wire or needle to clean out the jets. Be gentle to avoid damage.
- Blow compressed air through the passages to clear any remaining debris.
After cleaning the jets and passages, reassemble the carburetor and reinstall it on your snow blower.
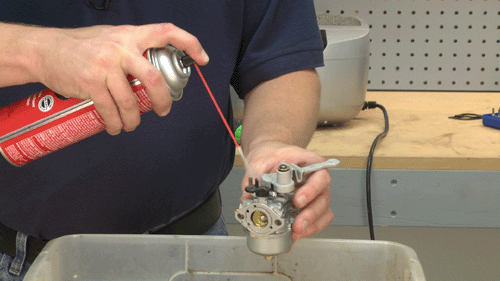
Using Carburetor Cleaner
Carburetor cleaner is a helpful tool for removing built-up residue. It can reach areas that are hard to clean with a wire. Here’s how to use it:
- Spray the carburetor cleaner into the jets and passages. Make sure to cover all areas.
- Allow the cleaner to sit for a few minutes. This helps dissolve the residue.
- Use a brush to scrub any stubborn spots. A toothbrush works well for this.
- Rinse the carburetor with clean water and dry it with compressed air.
Using a cleaner ensures that all parts are free from dirt and build-up. It’s an easy way to maintain your snow blower.
| Step | Description |
|---|---|
| 1 | Remove the carburetor and disassemble it. |
| 2 | Clean jets with a wire or needle. |
| 3 | Blow air through passages. |
| 4 | Spray cleaner into jets and passages. |
| 5 | Scrub with a brush and rinse with water. |
Regular cleaning of the carburetor keeps your snow blower in top shape. It ensures reliable performance when you need it most.
Reassembling The Carburetor
After cleaning the carburetor, putting it back together is crucial. Reassembling the carburetor correctly ensures your snow blower runs smoothly. Let’s break down this process into simple steps. Follow each step closely to avoid any mistakes.
Reattaching Fuel Lines
Reattaching fuel lines is the first step. Start by connecting the fuel lines to their respective ports on the carburetor.
- Check each line for cracks or damage. Replace if necessary.
- Ensure the lines are securely fitted onto the ports.
Tip: Use pliers to secure the lines firmly. Double-check that there are no leaks.
Securing The Carburetor
Securing the carburetor is the next step. Follow these steps:
- Align the carburetor with the mounting studs.
- Insert the mounting screws or bolts.
- Tighten them evenly with a wrench or screwdriver.
Make sure the carburetor is firmly in place. This will prevent any air leaks.
Once the carburetor is secure, reconnect any other parts you removed. Check all connections one more time. This will ensure everything is in place before you start the engine.
Testing The Snow Blower
After cleaning your snow blower carburetor, testing the machine ensures everything works well. This step involves checking for leaks and starting the engine. These tasks guarantee your snow blower operates smoothly and efficiently.
Checking For Leaks
Inspect the snow blower for any fuel leaks. Look around the carburetor and fuel lines. Even a small leak can cause issues. Use a clean cloth to wipe any spills. A dry surface helps you spot new leaks easily.
Next, check the fuel tank and fuel lines for cracks. Replace any damaged parts immediately. Ensuring there are no leaks keeps your snow blower safe and ready for use.
Starting The Engine
Start the snow blower engine to ensure it runs smoothly. First, fill the fuel tank with fresh gasoline. Make sure to open the fuel valve. Set the choke to the correct position.
Pull the starter cord or use the electric start button. Listen for any unusual sounds. The engine should start easily and run smoothly. If the engine struggles, double-check your work on the carburetor.
Let the engine run for a few minutes. Watch for any smoke or sputtering. These signs indicate further issues that need attention. A well-functioning snow blower makes clearing snow easier and faster.
Maintenance Tips
Keeping your snow blower carburetor clean is essential for efficient performance. Regular maintenance helps prevent clogging and extends the life of your machine. Follow these tips to ensure your snow blower is always ready for winter’s challenges.
Regular Cleaning Schedule
A consistent cleaning schedule is vital. Aim to clean the carburetor every 25 hours of use or at the end of each season. This prevents build-up and ensures smooth operation.
To clean the carburetor, follow these steps:
- Turn off the snow blower and let it cool down.
- Remove the carburetor cover and disconnect the fuel line.
- Use a carburetor cleaner spray to remove any deposits.
- Wipe the exterior with a clean cloth.
- Reassemble the parts and test the machine.
Storing The Snow Blower
Proper storage is crucial for maintaining your snow blower’s carburetor. Before storing, run the engine until the fuel tank is empty. This prevents fuel from clogging the carburetor.
Follow these steps for safe storage:
- Drain the fuel tank completely.
- Clean the carburetor as described above.
- Store the snow blower in a dry, covered area.
- Cover the machine to protect it from dust and moisture.
By following these maintenance tips, you can keep your snow blower in top condition and ready for the next snowfall.
Frequently Asked Questions
How Often To Clean Snow Blower Carburetor?
You should clean your snow blower carburetor at least once a year. Regular maintenance ensures optimal performance and longevity.
What Tools Are Needed For Carburetor Cleaning?
You will need a screwdriver, wrench, carburetor cleaner, and a clean cloth. These tools help you effectively clean the carburetor.
Can I Use Household Items To Clean The Carburetor?
Yes, a clean cloth and warm water can be used. However, specialized carburetor cleaner is more effective for thorough cleaning.
What Are Signs Of A Dirty Carburetor?
Signs include difficulty starting, poor engine performance, and black smoke. These indicate the need for cleaning the carburetor.
Conclusion
Cleaning your snow blower carburetor is crucial for efficient performance. Regular maintenance prevents engine issues. Follow the steps mentioned for a smooth process. Gather all necessary tools before starting. Ensure safety by working in a well-ventilated area. Clean parts thoroughly and reassemble carefully.
This simple task saves time and avoids costly repairs. Enjoy a well-functioning snow blower all winter. Keep your equipment in top shape. Happy snow clearing!

