
Changing the oil in your Honda lawn mower is simple. It keeps the engine running smoothly.
Regular maintenance of your lawn mower ensures it lasts longer. One important task is changing the oil. Fresh oil lubricates the engine parts and helps prevent wear and tear. It’s a simple process you can do at home. You’ll save money and keep your mower in top shape.
This guide will walk you through the steps. By the end, you’ll know how to change the oil in your Honda lawn mower quickly and easily. Let’s get started!
Tools And Materials Needed
Maintaining your Honda lawn mower ensures a long life and efficient performance. One key maintenance task is changing the oil. Before you start, gather all the necessary tools and materials. This will make the process smooth and hassle-free.
Essential Tools
Having the right tools will make your oil change quick and easy. Here’s a list of essential tools you need:
- Wrench Set: To remove bolts and the oil drain plug.
- Oil Pan: To catch the old oil safely.
- Oil Funnel: Ensures you pour new oil without spills.
- Rags or Paper Towels: For cleaning up any messes.
- Gloves: Protect your hands from oil and dirt.
Required Materials
Besides tools, you’ll need specific materials for the oil change. These items are crucial for the task:
- Honda Lawn Mower Oil: Use the recommended oil type for your model.
- Replacement Oil Filter: If your mower has one, replace it during the oil change.
- Oil Disposal Container: Safely store the used oil until you can recycle it.
In summary, gather all these tools and materials before you begin. This preparation will make the oil change process smooth and stress-free.
Preparing The Lawn Mower
Changing the oil in your Honda lawn mower is a crucial maintenance task. Proper preparation can make this process smooth and efficient. Follow these steps to get your mower ready for an oil change.
Safety Precautions
Always prioritize safety when working on your lawn mower. First, disconnect the spark plug wire to prevent accidental starts. This is a key step to avoid any injuries. Wear protective gloves to keep your hands clean and safe. Also, ensure the engine is cool before you start working on it.
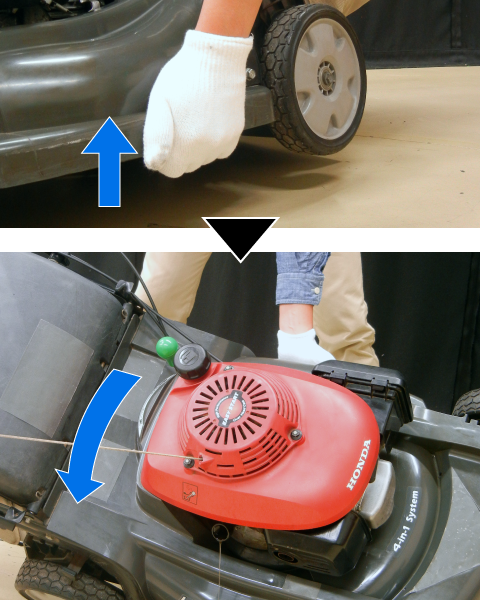
Positioning The Mower
Find a flat, stable surface to place your lawn mower. This prevents the mower from tipping over during the oil change. Ideally, do this task outdoors or in a well-ventilated area. Elevate the mower slightly by using a ramp or sturdy blocks. This makes it easier to access the oil drain plug.
Ensure the mower is secure and won’t move during the process. A stable position helps you avoid spills and makes draining the oil straightforward.
Draining The Old Oil
Draining the old oil is essential for maintaining your Honda lawn mower. This step ensures that your mower runs smoothly and efficiently. Neglecting this task can lead to engine problems. Follow the steps below to drain the old oil properly.
Locating The Oil Plug
First, you need to locate the oil plug on your Honda lawn mower. The oil plug is usually found on the underside of the mower. Look for a small, round plug near the engine’s base. Refer to your mower’s manual for the exact location.
Once you find the oil plug, place the mower on a flat surface. This will prevent any spills and make the process easier. Use a wrench to loosen the oil plug. Be careful not to strip the plug’s threads.
Collecting The Old Oil
Before you remove the oil plug completely, place an oil pan or container beneath it. This will collect the old oil and prevent any mess. Make sure the container is large enough to hold all the oil.
Now, fully remove the oil plug and let the old oil drain into the container. This may take a few minutes. Tilt the mower slightly to ensure all the oil drains out. Once the oil flow stops, wipe the oil plug and its surroundings clean.
Replace the oil plug and tighten it securely. Proper disposal of the used oil is important. Take it to a recycling center or an auto shop that accepts used oil. Never pour it down the drain or on the ground.
Replacing The Oil Filter
Changing the oil in your Honda lawn mower is essential for its performance. One crucial step is replacing the oil filter. A clean filter helps the engine run smoothly. Let’s dive into the process of replacing the oil filter with clear and simple steps.
Removing The Old Filter
First, locate the oil filter on your Honda lawn mower. Usually, it is near the engine. Use a wrench to loosen the filter. Turn the filter counterclockwise to remove it. Be careful; some oil might spill out.
Place a container under the filter to catch any dripping oil. After removing the filter, clean the area around the filter mount. This ensures a good seal for the new filter.
Installing The New Filter
Take the new oil filter and apply a thin layer of oil to the gasket. This helps create a tight seal. Screw the new filter onto the filter mount. Turn it clockwise until it is snug.
Use your hand to tighten the filter. Do not over-tighten it. After the filter is in place, wipe away any excess oil. This prevents dirt from sticking to the area.
Finally, add new oil to the mower as per the manufacturer’s guidelines. Check the oil level with the dipstick. Ensure it is at the correct level before starting the mower.
Here is a quick summary of the steps:
- Locate the oil filter
- Use a wrench to remove the old filter
- Clean the filter mount area
- Apply oil to the new filter’s gasket
- Screw on the new filter
- Tighten by hand
- Add new oil and check the level
Following these steps will help keep your Honda lawn mower running efficiently.
Refilling With New Oil
Refilling your Honda lawn mower with new oil is a crucial step. This ensures your machine runs smoothly and efficiently. Follow these steps to choose and pour the new oil correctly.
Choosing The Right Oil
First, pick the correct oil for your Honda lawn mower. Refer to the manual for the recommended oil type. Usually, SAE 30 oil works well in warm weather. For colder climates, 10W-30 oil is a better choice. Always check the manual to be sure.
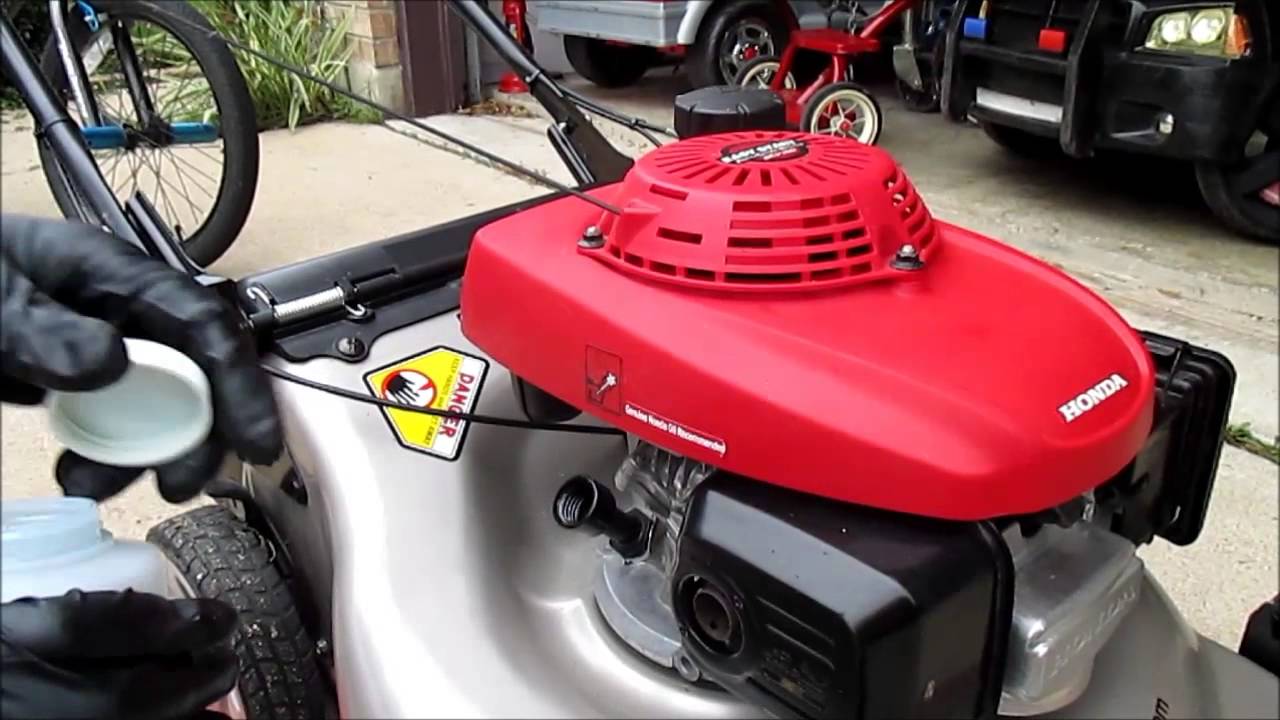
Pouring The New Oil
Place the lawn mower on a flat surface. This ensures even distribution of the new oil. Use a clean funnel to avoid spills. Slowly pour the new oil into the oil fill tube. Check the oil level using the dipstick. Do not overfill. Close the oil cap tightly after filling.
Start the lawn mower and let it run for a few minutes. This allows the new oil to circulate. Turn off the mower and check the oil level again. Add more oil if needed. Proper oil levels ensure your mower runs efficiently.
Checking The Oil Level
Checking the oil level in your Honda lawn mower is crucial for its performance. Regular oil checks prevent engine damage and ensure smooth operation. This guide helps you understand how to check the oil level properly. Follow these steps to keep your lawn mower in top shape.
Using The Dipstick
First, locate the dipstick on your Honda lawn mower. Usually, it is near the engine. Remove the dipstick and wipe it clean with a cloth. Insert it back fully, then pull it out to check the oil level. The oil should be between the two marks on the dipstick.
If the oil is below the lower mark, you need to add more. If it’s above the upper mark, you have too much oil. This simple check keeps your mower running smoothly.
Adjusting The Oil Level
To adjust the oil level, first make sure your lawn mower is on a flat surface. If the oil is low, add small amounts of oil. Use a funnel to avoid spills. Check the dipstick again after adding oil.
Repeat this process until the oil level is correct. If you have too much oil, you need to drain some. Use a container to catch the excess oil and be careful not to overfill.
Regularly checking and adjusting the oil level extends the life of your Honda lawn mower. This simple maintenance task ensures reliable performance every time you mow.
Disposing Of Old Oil
Disposing of old oil from your Honda lawn mower is crucial. Improper disposal can harm the environment. Follow these guidelines to ensure safe and eco-friendly disposal.
Environmental Guidelines
Used oil contains contaminants. These can pollute soil and water. Follow local regulations for disposing of oil. Do not pour oil down drains or into the ground.
Store old oil in a sealed container. Use a container that won’t leak. Label the container as used oil. Keep it away from children and pets.
Disposal Locations
Many locations accept used oil. Auto parts stores often take old oil. Some service stations also accept used oil. Check with your local waste disposal service.
Recycling centers are a good option too. Many centers have drop-off points for oil. Call ahead to confirm they accept used oil. Take your sealed container to the center.
Community collection events sometimes happen. These events collect hazardous waste. Old oil is considered hazardous. Look for events in your area.

Maintenance Tips
Maintaining your Honda lawn mower is essential for its longevity and performance. Regular oil changes, proper storage, and attention to detail can keep your mower running smoothly. Follow these tips to ensure your mower stays in top condition.
Regular Oil Changes
Changing the oil in your Honda lawn mower is crucial for its engine health. Fresh oil lubricates the engine, reduces wear, and prevents overheating.
To change the oil:
- Warm up the engine for a few minutes.
- Turn off the engine and disconnect the spark plug.
- Drain the old oil into a container.
- Replace the oil filter, if necessary.
- Fill the engine with new oil up to the recommended level.
- Reconnect the spark plug and start the engine to check for leaks.
Repeat this process every 25-50 hours of use or at least once a season.
Storage Advice
Proper storage of your lawn mower can prevent many common issues. Follow these steps to store your mower correctly:
- Clean the mower thoroughly to remove grass and debris.
- Drain the fuel tank or add a fuel stabilizer.
- Change the oil and replace the air filter.
- Lubricate all moving parts to prevent rust.
- Store the mower in a dry, sheltered area.
These steps help prevent rust, engine problems, and other issues. Proper storage prolongs the life of your mower.
| Task | Frequency |
|---|---|
| Oil Change | Every 25-50 hours or once a season |
| Clean Mower | After each use |
| Fuel Stabilizer | Before storage |
| Lubricate Parts | Before storage |
Following these maintenance tips will keep your Honda lawn mower in excellent condition. Regular oil changes and proper storage are key to longevity.
Frequently Asked Questions
How Often Should I Change Oil In My Honda Lawn Mower?
You should change the oil in your Honda lawn mower every 50 hours of use or at least once a season.
What Type Of Oil Does A Honda Lawn Mower Use?
Honda lawn mowers typically use SAE 10W-30 oil. Always check your owner’s manual for specific recommendations.
Can I Change The Oil In My Honda Lawn Mower Myself?
Yes, you can change the oil yourself. It’s a simple process that involves draining the old oil, replacing the oil filter, and adding new oil.
What Tools Do I Need To Change The Oil?
You will need a wrench, oil drain pan, funnel, and new oil. Optionally, you may also need an oil filter wrench.
Conclusion
Changing the oil in your Honda lawn mower is easy. Follow the steps. Gather your tools and supplies. Drain the old oil. Refill with fresh oil. Regular oil changes extend mower life. Better performance, cleaner cuts. Keep your lawn mower in top shape.
Consistent maintenance saves money. Enjoy a healthy, beautiful lawn. Happy mowing!
