
Testing a voltage regulator on a lawn mower is crucial for maintenance. A faulty regulator can lead to battery problems.
Voltage regulators control the electricity flow to your mower’s battery. Knowing how to test them ensures your mower runs smoothly. This guide will teach you how to check the voltage regulator on your lawn mower. With simple steps, you can identify issues and save on repairs.
Let’s dive into the basics and get your mower back in shape.

Tools Needed
Testing a voltage regulator on a lawn mower ensures it runs smoothly. To begin, you need specific tools. Some are essential, while others are optional but helpful.
Essential Tools
Start with a multimeter. It measures voltage and ensures the regulator works. You also need a wrench set. This helps in removing the battery or other parts. Keep a pair of insulated gloves handy. They protect you from electric shocks.
Optional Tools
A screwdriver set can be useful. It helps in removing any screws or panels. A battery load tester can also be handy. It checks the battery’s condition and performance. A voltage regulator tester is another good tool. It gives precise readings for the regulator.
Safety Precautions
Testing a voltage regulator on a lawn mower requires careful attention to safety. Following the right safety precautions can prevent injuries and equipment damage.
Personal Safety
Always wear safety gloves and goggles. These protect your hands and eyes from sparks and debris.
Work in a well-ventilated area. This reduces the risk of inhaling harmful fumes.
Keep your workspace clean and dry. This helps you avoid slips and falls.
Equipment Safety
Ensure the lawn mower is off and cool before you start. This prevents burns and electric shocks.
Use insulated tools. These reduce the risk of electric shock.
Double-check that your voltage meter works correctly. A faulty meter can give incorrect readings and lead to mistakes.
Disconnect the battery before testing the voltage regulator. This prevents accidental short circuits.
Preparing The Lawn Mower
Before you start testing the voltage regulator on your lawn mower, it is crucial to prepare your equipment properly. Proper preparation ensures safety and efficiency. Follow these steps to get your lawn mower ready for testing.
Inspecting The Mower
Begin by inspecting the mower. Check for any obvious signs of damage or wear. Look at the wires and connectors for any corrosion or loose connections. Ensure all parts are intact and in good condition.
- Check the battery and its connections.
- Look for frayed or damaged wires.
- Ensure the mower is on a flat surface.
Taking a few minutes to inspect the mower can save time and prevent accidents.
Locating The Voltage Regulator
Next, you need to locate the voltage regulator on your lawn mower. The voltage regulator is usually near the engine. It controls the voltage output to the battery and other electrical components.
- Refer to your mower’s manual for the exact location.
- Look for a small box with wires connected to it.
- Ensure the mower is turned off and the key is removed.
Once you have located the voltage regulator, you are ready to begin testing it. Knowing the exact location helps you perform the test accurately and safely.
Testing With A Multimeter
Testing a voltage regulator on a lawn mower involves using a multimeter. Connect the multimeter leads to the regulator terminals. Check the voltage readings to ensure proper function.
Testing the voltage regulator on your lawn mower ensures it functions properly. A multimeter is a handy tool for this job. It allows you to measure the voltage output accurately. Below, we will guide you through the steps to test a voltage regulator using a multimeter.Setting Up The Multimeter
First, prepare your multimeter. Set the dial to the DC voltage setting. This is usually marked with a “V” and a straight line. Make sure your multimeter is functioning correctly. Next, connect the black probe to the ground or negative terminal. This is often labeled with a minus sign (-). Attach the red probe to the positive terminal. This is usually marked with a plus sign (+). Ensure that the connections are secure. Loose connections can result in inaccurate readings.Measuring Voltage Output
Start your lawn mower and let it run. It should be running at full throttle for an accurate reading. Place the black probe on the ground terminal of the voltage regulator. Then, place the red probe on the output terminal of the voltage regulator. Look at the multimeter display. A healthy voltage regulator should show a stable reading. The voltage should be within the manufacturer’s specified range. If the reading is too high or too low, the voltage regulator may be faulty. Consider replacing it.| Condition | Voltage Reading | Action |
|---|---|---|
| Normal | Within specified range | No action needed |
| High Voltage | Above specified range | Replace voltage regulator |
| Low Voltage | Below specified range | Check connections or replace voltage regulator |
Interpreting The Results
Once you have tested the voltage regulator on your lawn mower, understanding the results is crucial. This section will guide you through interpreting the readings from your multimeter. We will explain what a normal voltage range looks like and how to identify any issues.
Normal Voltage Range
For a healthy voltage regulator, the voltage range should fall between 13.8 and 14.5 volts. Use your multimeter to measure the output. If the reading is within this range, your voltage regulator is functioning properly. Anything significantly above or below this range indicates a problem.
| Voltage Reading | Status |
|---|---|
| 13.8 – 14.5 volts | Normal |
| Below 13.8 volts | Low Voltage |
| Above 14.5 volts | High Voltage |
Identifying Issues
If your voltage reading is outside the normal range, it indicates a problem. Here are some common issues:
- Low Voltage: This could mean a weak battery or a failing alternator. Check the battery connections and ensure they are tight and clean.
- High Voltage: This could indicate the voltage regulator is overcharging. This can damage the battery over time. Consider replacing the voltage regulator.
To address these issues, follow these steps:
- Inspect the battery for corrosion or loose connections.
- Test the alternator output with a multimeter.
- Replace the voltage regulator if it shows signs of overcharging.
Taking these steps will ensure your lawn mower runs smoothly and prolong the life of your equipment.
Troubleshooting Common Problems
Testing a voltage regulator on a lawn mower is crucial for maintaining its performance. Troubleshooting common problems can save time and ensure a smooth-running engine. Here are some common issues you may encounter and how to address them.
Voltage Fluctuations
Voltage fluctuations can cause various problems with your lawn mower. To test for fluctuations, follow these steps:
- Start the lawn mower and let it run.
- Use a multimeter to measure the voltage output.
- Check the reading against the manufacturer’s specifications.
If the voltage reading is unstable, it could indicate a faulty voltage regulator. Ensure all connections are secure. Loose wires can cause erratic voltage readings.
No Voltage Output
No voltage output is a common issue. To troubleshoot, follow these steps:
- Ensure the lawn mower is turned on.
- Set your multimeter to the appropriate voltage setting.
- Place the multimeter probes on the regulator output terminals.
If there is no voltage reading, the regulator may be defective. Check the wiring harness for damage. Replace any worn or broken wires.
Regular maintenance and timely troubleshooting can prevent major issues. By following these simple steps, you can ensure your lawn mower’s voltage regulator operates efficiently.
Maintaining The Voltage Regulator
Maintaining the voltage regulator in your lawn mower is crucial for its performance. A well-maintained voltage regulator ensures your mower runs smoothly and efficiently. Regular checks and timely replacements can save you from unexpected breakdowns. This section will guide you on how to keep your voltage regulator in top condition.
Regular Inspections
Regular inspections help detect issues early. Check the voltage regulator at least once a season. Look for signs of wear or damage. Inspect the connections to ensure they are tight and free of corrosion. A visual inspection can often reveal potential problems.
Use a multimeter to check the output voltage. The voltage should match the specifications in your lawn mower’s manual. If the output is irregular, it may indicate a problem. Regular inspections can prolong the life of your voltage regulator.
Timely Replacements
Replace the voltage regulator if it shows signs of failure. Common symptoms include inconsistent power output, flickering lights, or a dead battery. Replacing a faulty regulator prevents further damage to the mower’s electrical system.
Use a replacement part that matches the original specifications. Consult your lawn mower’s manual for the correct part number. Timely replacements ensure your mower operates at peak efficiency. This practice also reduces the risk of unexpected breakdowns.

Frequently Asked Questions
How To Test If A Voltage Regulator Is Bad?
To test a voltage regulator, use a multimeter. Measure the input and output voltages. If the output is inconsistent or zero, the regulator is faulty.
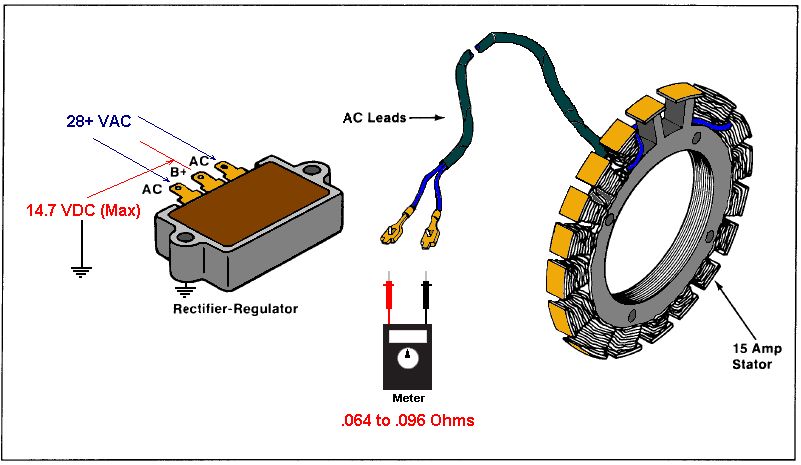
How To Test A Voltage Regulator Rectifier On A Lawn Mower?
To test a voltage regulator rectifier on a lawn mower, use a multimeter. Check the battery voltage, then measure the AC output from the stator. Next, measure the DC voltage output from the rectifier. Ensure all readings are within the manufacturer’s specifications.
Will An Engine Run With A Bad Voltage Regulator?
Yes, an engine can run with a bad voltage regulator. However, it can cause battery drainage and electrical issues.
Why Won’t My Lawn Mower Battery Stay Charged?
Your lawn mower battery might not stay charged due to a faulty charger, bad battery, loose connections, or parasitic drain. Check and replace the charger or battery if needed. Ensure all connections are secure and clean. Store the battery properly during off-season.
Conclusion
Testing a voltage regulator on a lawn mower is essential. It ensures your mower runs smoothly. Follow the steps outlined for accurate results. Regular checks can prevent unexpected issues. A well-maintained lawn mower lasts longer. Take the time to test and keep your equipment in top shape.
Your lawn will thank you. Happy mowing!
