Testing a lawn mower starter solenoid is crucial. It ensures your mower starts smoothly.
The starter solenoid is a small but vital part of your lawn mower’s engine. It acts like a bridge, allowing electricity to flow from the battery to the starter motor. If the solenoid fails, your mower won’t start, no matter how well you maintain other parts.
Understanding how to test this component can save you time and money on repairs. In this guide, we’ll walk you through simple steps to check your lawn mower’s starter solenoid. You’ll learn to diagnose issues quickly and efficiently, ensuring your lawn mower remains in top condition. Let’s dive in and keep your mower running smoothly!

Safety Precautions
Testing a lawn mower starter solenoid requires attention to safety. Accidents can occur if proper precautions are not followed. This guide ensures your safety while performing this task.
Essential Safety Gear
Before starting, gather the necessary safety gear. Wear gloves to protect your hands from sharp parts. Use safety goggles to shield your eyes from debris. Ensure you’re wearing closed-toe shoes to protect your feet.
Here is a list of essential items:
- Gloves
- Safety goggles
- Closed-toe shoes
Disconnecting The Battery
Disconnecting the battery is crucial for safety. This step prevents electrical shocks and accidental startups.
Follow these steps:
- Locate the battery in your lawn mower.
- Use a wrench to loosen the negative terminal.
- Remove the cable from the terminal.
- Repeat with the positive terminal.
Ensure the cables do not touch the terminals during the test.
Locating The Solenoid
Testing a lawn mower starter solenoid starts with locating it. This task may seem difficult, but with some guidance, it can be simple. Let’s break it down step by step to make it easier.
Understanding The Lawn Mower Layout
First, you need to understand the layout of your lawn mower. Typically, lawn mowers have a few common sections:
- Engine: The heart of the mower, usually at the front.
- Battery: Powers the starter solenoid, often located under the seat or hood.
- Starter Solenoid: Connects the battery to the starter motor, usually near the battery.
Knowing these sections helps in quickly locating the solenoid.
Identifying The Solenoid
Next, you need to identify the solenoid itself. Look for a small cylindrical or box-shaped component. It usually has wires connected to it.
Follow these steps:
- Open the mower hood: Ensure the mower is off and cool.
- Locate the battery: Find the battery and trace the wires.
- Find the solenoid: Look for the part where the battery wires connect to the starter motor.
Here’s a simple table to help you identify the solenoid:
| Component | Description |
|---|---|
| Battery | Usually a rectangular block, often under the seat or hood |
| Solenoid | Small cylindrical or box-shaped, with wires attached |
| Starter Motor | Connected to the solenoid, larger and often closer to the engine |
By following these steps, you can easily locate the solenoid on your lawn mower.
Preparing For The Test
Before diving into testing your lawn mower starter solenoid, proper preparation is key. Ensuring you have all the necessary tools and setting up your multimeter correctly will make the process smoother. This section will guide you through these critical steps.
Gathering Necessary Tools
First, gather all the tools you need. This includes a wrench, a screwdriver, and a multimeter. Ensure the multimeter has fresh batteries. A good connection is crucial. Also, have your lawn mower’s manual handy for reference. It can provide specific guidance for your model.
Setting Up The Multimeter
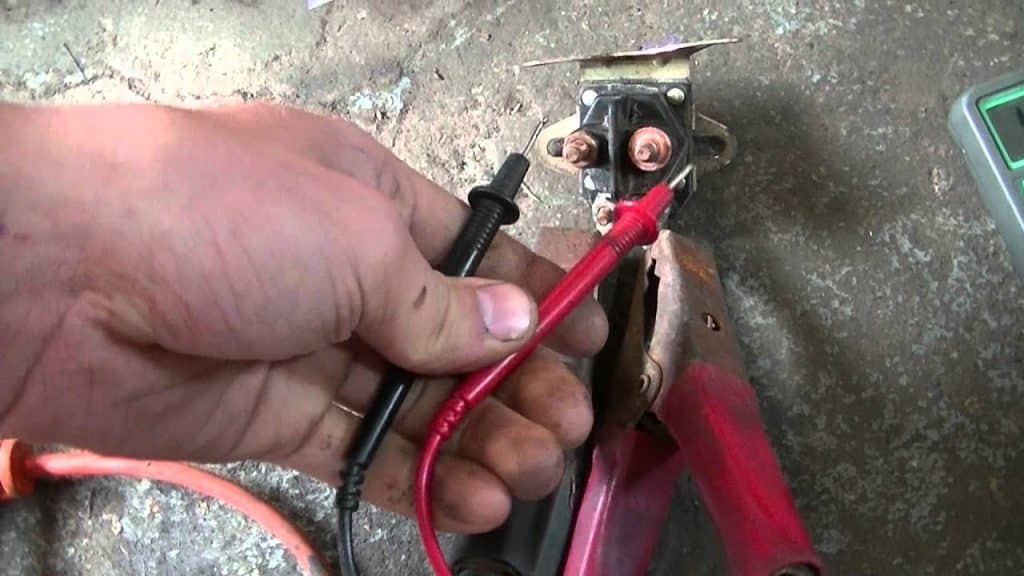
Next, set up your multimeter. Turn the dial to the continuity test setting. This setting often looks like a sound wave symbol. Insert the black probe into the COM port. Place the red probe into the VΩmA port. Your multimeter is now ready to test the solenoid.

Testing The Solenoid
The solenoid is an important part of your lawn mower’s electrical system. Testing it can help you determine if it’s working properly or needs replacement. Below, you’ll find two simple methods to test the solenoid: performing a click test and conducting a voltage test.
Performing A Click Test
To perform a click test, follow these steps:
- Turn the ignition key to the “on” position.
- Listen for a clicking sound from the solenoid.
- If you hear a click, the solenoid is likely working.
- If there is no click, the solenoid may be faulty.
This test is quick and easy. It helps you determine if the solenoid is engaging. Remember, a click means the solenoid is trying to work.
Conducting A Voltage Test
To conduct a voltage test, you’ll need a multimeter. Follow these steps:
- Set the multimeter to measure voltage.
- Connect the positive probe to the positive terminal of the solenoid.
- Connect the negative probe to the ground or negative terminal.
- Turn the ignition key to the “start” position.
- Observe the multimeter reading.
If the voltage reading is 12 volts or close, the solenoid is working. If the reading is low or zero, the solenoid may be bad. This test provides a clear indication of the solenoid’s condition.
By following these simple tests, you can quickly diagnose your lawn mower’s solenoid. Knowing how to test it can save you time and effort.
Interpreting The Results
Interpreting the results of your lawn mower starter solenoid test is crucial. This step helps you understand the functionality of the solenoid. It guides you on the next steps to take. Below, we break down the key areas to focus on.
Analyzing Click Test Results
The click test is a simple yet effective method. It helps determine if the solenoid is engaging. Here’s what you need to know:
- Click sound: If you hear a click, it means the solenoid is receiving power.
- No click sound: If there’s no click, the solenoid might be faulty or not receiving power.
A click sound indicates the solenoid is likely working. No sound suggests a deeper issue. You might need to check the battery or wiring.
Understanding Voltage Readings
Voltage readings provide more detailed information. Use a multimeter to measure the voltage. Follow these steps:
- Set your multimeter to measure DC voltage.
- Connect the multimeter probes to the solenoid terminals.
- Turn the ignition key to the start position.
Interpret the readings as follows:
| Voltage Reading | Interpretation |
|---|---|
| 12V | Normal voltage. Solenoid is likely good. |
| Less than 12V | Low voltage. Check the battery and connections. |
| 0V | No voltage. Solenoid or wiring may be faulty. |
Use these readings to assess the solenoid’s health. A reading of 12V indicates a healthy solenoid. Anything less requires further inspection.
Troubleshooting Common Issues
Testing a lawn mower starter solenoid can be a bit tricky. Understanding common issues can help you identify the root of the problem quickly. Below, we discuss two frequent problems: no click sound and incorrect voltage readings.
No Click Sound
A common issue is the absence of a click sound when turning the key. This usually indicates a problem with the starter solenoid. Follow these steps to troubleshoot this issue:
- Check the battery. Ensure it has a full charge.
- Inspect the battery terminals. They should be clean and free of corrosion.
- Use a multimeter to test the solenoid. Connect the positive lead to the battery terminal and the negative lead to the ground.
- If the solenoid does not click, it may be faulty and need replacing.
Incorrect Voltage Readings
Another frequent problem is getting incorrect voltage readings. This can be due to several reasons. Here’s how to troubleshoot:
- First, ensure your multimeter is set to the correct voltage range.
- Connect the multimeter’s leads to the solenoid’s terminals.
- Turn the key to the start position. The voltage reading should match the battery voltage.
- If the reading is too low, check for loose or corroded connections.
- Inspect the wiring for any signs of damage.
- If the wiring looks fine, the solenoid itself may be faulty and need replacement.
By understanding these common issues, you can troubleshoot your lawn mower starter solenoid more effectively. Ensuring all connections are clean and secure is vital for accurate testing.
Replacing A Faulty Solenoid
Replacing a faulty solenoid in your lawn mower is crucial. A bad solenoid can stop your mower from starting. Follow these steps to replace it effectively. This guide will simplify the process.
Purchasing A New Solenoid
First, buy a new solenoid that matches your lawn mower. Check your mower’s manual for the correct part number. You can find solenoids at hardware stores or online.
Ensure the solenoid matches the specifications of your mower. This helps avoid compatibility issues. Keep the receipt in case you need to return it.
Installing The Replacement
Before starting, disconnect the mower’s battery. This prevents any accidental shocks. Locate the solenoid on your mower. It’s usually near the battery or starter motor.
Remove the old solenoid by unscrewing it. Take note of how the wires connect. This will help when connecting the new solenoid. Attach the new solenoid by securing it with screws.
Reconnect the wires as they were on the old solenoid. Tighten the screws firmly to ensure a good connection. Reconnect the battery and test the mower. It should start smoothly if the solenoid was the issue.

Frequently Asked Questions
How Do I Know If My Starter Solenoid Is Bad On My Lawn Mower?
Check for clicking sounds when turning the key. Test for voltage at the solenoid terminals. If there’s no power or clicking, the solenoid is likely bad.
How Do You Test A Starter Solenoid With A Multimeter?
Set the multimeter to the voltage setting. Connect the positive lead to the solenoid’s battery terminal. Attach the negative lead to the ground. Turn the ignition key to the “start” position. Check for voltage. If the reading is 12V or higher, the solenoid is functioning properly.
How To Tell If A Starter Solenoid Is Bad?
To tell if a starter solenoid is bad, listen for a clicking sound when turning the key. Check if the engine doesn’t start. Test with a multimeter for proper voltage. Inspect for corroded or loose connections.
When I Turn The Key On My Mower And Nothing Happens?
Check the battery, connections, and fuses. Ensure the brake is engaged and the blade switch is off.
Conclusion
Testing a lawn mower starter solenoid is straightforward with the right steps. Begin by gathering necessary tools. Next, follow the outlined process to check for issues. Pay attention to connections and battery condition. Address any problems promptly to avoid bigger issues later.
Regular testing ensures your lawn mower runs smoothly. Keep these tips in mind for a well-maintained machine. Happy mowing!
