
Replacing the pull cord on a lawn mower might seem daunting. But it’s a simple task with the right guidance.
A pull cord, also known as a starter rope, is vital for starting your lawn mower. Over time, it can wear out or break. If your lawn mower’s pull cord needs replacement, don’t worry. You don’t need to be a mechanic to fix it.
With a few basic tools and a bit of patience, you can replace the pull cord yourself. This guide will walk you through the steps, ensuring your lawn mower is up and running again in no time. Let’s get started on making your lawn mowing hassle-free again!

Safety Precautions
Wear gloves and safety goggles. Disconnect the spark plug to prevent accidental starting. Keep tools and parts organized for easy access.
Replacing the pull cord on your lawn mower can be a simple task. Safety must be a top priority. Follow these safety precautions to avoid injuries and ensure a smooth repair process.
Wearing Protective Gear
Always wear protective gear before starting any repair. Safety glasses shield your eyes from debris and sparks. Gloves protect your hands from sharp edges and hot surfaces. Wearing closed-toe shoes is crucial. They protect your feet from falling tools or mower parts. These small steps can prevent accidents and keep you safe.
Disconnecting The Spark Plug
Disconnecting the spark plug is a must. It prevents the engine from starting accidentally. Locate the spark plug wire. Pull it off the plug. This simple step ensures the mower won’t start while you work. Always check that the mower is off and the spark plug is disconnected. These precautions keep you safe during repairs.
“`
Accessing The Pull Cord
Replacing a pull cord on a lawn mower can be a straightforward task. First, you’ll need to access the pull cord. This process involves removing the engine cover and locating the pull cord housing. Let’s dive into the steps required to access the pull cord.
Removing The Engine Cover
To start, you need to remove the engine cover. This cover protects the engine and other internal parts.
- First, disconnect the spark plug wire for safety.
- Next, use a screwdriver to remove the screws securing the engine cover.
- Keep the screws in a safe place to avoid losing them.
- Gently lift the engine cover off the mower.
With the engine cover removed, you can easily see the components inside. This step is crucial for accessing the pull cord.
Locating The Pull Cord Housing
Once the engine cover is off, you need to find the pull cord housing. This housing holds the pull cord and the recoil mechanism.
- Look for a round or square-shaped cover near the top of the engine.
- This cover usually has a hole where the pull cord exits.
- Use a screwdriver to remove the screws holding the pull cord housing.
- Carefully lift the housing to avoid damaging the recoil spring.
Now, you have clear access to the pull cord and its housing. This makes it easier to replace the pull cord. Follow the next steps to complete the replacement process.
Removing The Old Pull Cord
Replacing the pull cord on your lawn mower involves several steps. The first step is removing the old pull cord. This task might seem difficult, but with the right guidance, it becomes easy. Follow the steps below to safely remove the old pull cord from your lawn mower.
Unwinding The Old Cord
First, locate the starter housing on the lawn mower. Use a screwdriver to remove the screws holding the housing. Once the housing is off, you will see the spool. Carefully unwind the old cord from the spool. The cord might be knotted or tangled. Take your time to avoid damaging any parts.
Detaching From The Handle
Next, find where the cord attaches to the handle. The handle might have a small knot or a clip. Untie the knot or remove the clip to free the cord. If the cord is stuck, use pliers to pull it out. Make sure the handle is clean and ready for the new cord.
Preparing The New Pull Cord
Replacing the pull cord on a lawn mower involves preparing the new cord. Begin by cutting the new cord to the required length. Secure the ends to prevent fraying, ensuring a smooth and durable replacement process.
Replacing the pull cord on your lawn mower can seem daunting. But with the right steps, it’s manageable. This section covers how to prepare the new pull cord. Follow these steps to ensure a smooth replacement process.
Measuring And Cutting The Cord
First, measure the old pull cord. Lay it flat and use a tape measure. Note the length. If the old cord is broken, check your mower manual for the correct length. Once you have the measurement, cut the new cord to the same length. Use a sharp knife or scissors. Make sure the cut is clean.
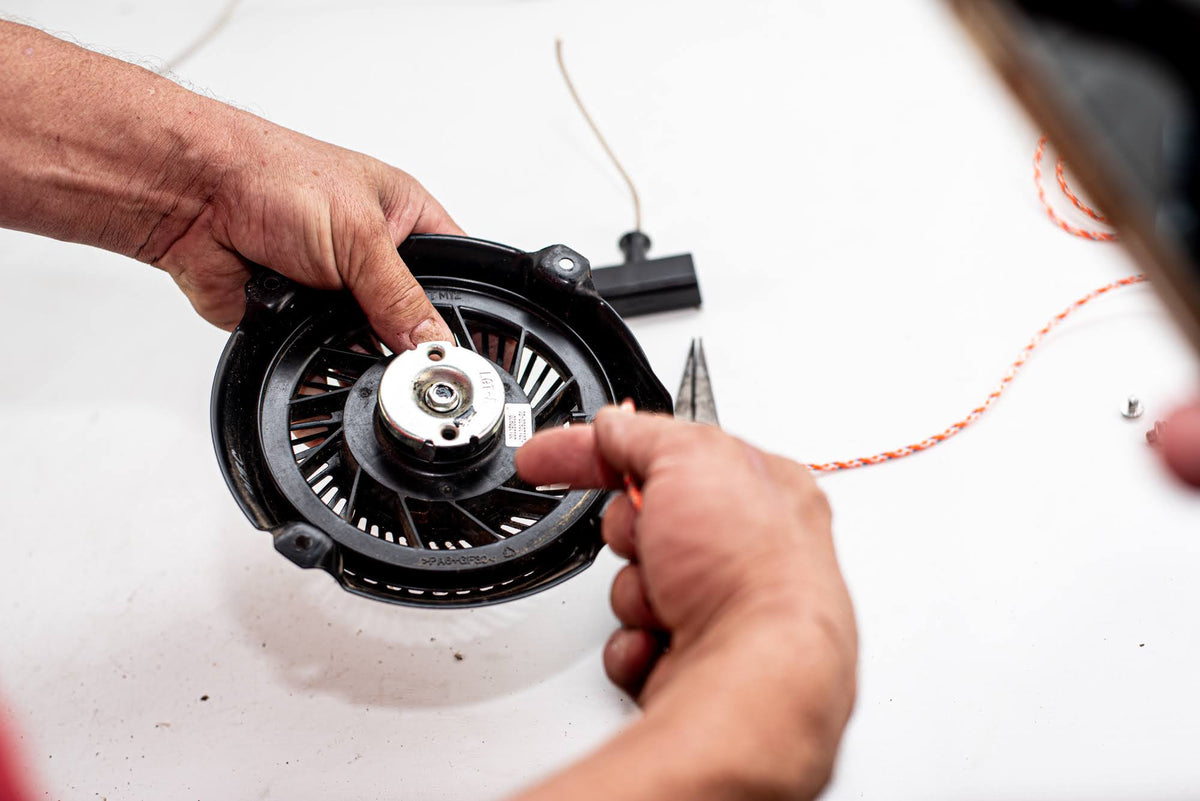
Tying Secure Knots
Next, tie a knot at one end of the new cord. This knot will keep the cord secure inside the starter handle. Insert the other end of the cord through the handle. Pull it through until the knot sits snugly in the handle. Now, tie a second knot at the other end of the cord. This knot will attach the cord to the rewind spring. Double-check both knots to ensure they are tight and secure.
“`
Installing The New Pull Cord
Replacing a pull cord on your lawn mower can be a straightforward task. This guide will help you install the new pull cord easily. Follow these steps to ensure your lawn mower is up and running in no time.
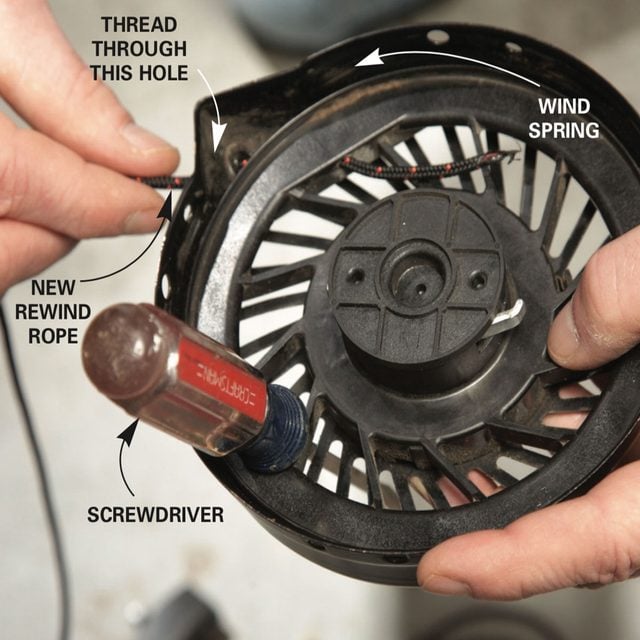
Threading Through The Housing
First, you need to thread the new pull cord through the housing. Start by feeding the cord through the hole in the starter housing. Ensure the cord is straight and free from knots.
Next, pull the cord through until it reaches the starter pulley. Wrap the cord around the pulley in the correct direction. Look for arrows or guides on the pulley to help you.
Secure the cord to the pulley by tying a knot. A strong knot will prevent the cord from slipping. Ensure the knot is tight and secure.
Attaching To The Handle
Now, attach the pull cord to the handle. Thread the cord through the handle hole. If the handle has a clip, use it to secure the cord.
Next, tie a knot at the end of the cord. The knot should be tight to prevent the cord from slipping through the handle.
Finally, test the pull cord by gently pulling the handle. Ensure the cord moves smoothly and retracts properly. If it does, your new pull cord installation is complete.
Reassembling The Lawn Mower
Once you’ve replaced the pull cord on your lawn mower, it’s time to reassemble the machine. This step is crucial to ensure everything is properly secured and the mower runs smoothly. Follow these steps carefully to get your lawn mower back in top shape.
Reattaching The Engine Cover
First, position the engine cover back over the engine. Align the cover with the screw holes. This ensures a proper fit. Use the screws you set aside earlier. Tighten them securely with a screwdriver. Do not overtighten, to avoid damaging the threads.
| Step | Action |
|---|---|
| 1 | Position the engine cover |
| 2 | Align with screw holes |
| 3 | Insert and tighten screws |
Reconnecting The Spark Plug
Next, reconnect the spark plug wire. This step is essential for the mower to start. Locate the spark plug and the wire. Push the wire connector onto the spark plug terminal. Ensure it fits snugly.
- Locate the spark plug
- Identify the wire connector
- Push the connector onto the terminal
After reconnecting the spark plug, perform a quick check. Pull the starter cord gently. The engine should offer resistance, indicating a proper connection. Now, your lawn mower is ready for action!
Testing The New Pull Cord
After installing the new pull cord on your lawn mower, it’s essential to test it. This step ensures the pull cord works correctly and the mower starts smoothly. A proper test will save you time and prevent future issues.
Performing A Test Pull
First, grip the pull handle firmly. Pull it gently to check for resistance. If it feels smooth, continue pulling until the engine starts. Listen for any unusual sounds. The engine should roar to life without hesitation.
If the cord retracts smoothly, it indicates proper installation. Repeat the process a few times. Ensure the cord does not snag or get stuck. A consistent pull means the job is well done.
Troubleshooting Common Issues
Sometimes, the pull cord may not function as expected. If the cord sticks, inspect the pulley system. It might need lubrication or adjustment. Check the cord for any twists or knots.
If the engine does not start, verify the fuel level and spark plug. Ensure all connections are secure. Clean the air filter for better performance. These simple checks can resolve most issues.
If problems persist, re-examine the installation. Ensure the pull cord is wound correctly on the pulley. Sometimes, a minor tweak can fix the issue. Patience and careful inspection are key to troubleshooting.
Maintenance Tips
Maintaining your lawn mower can extend its life and ensure optimal performance. Simple upkeep tasks can prevent larger, more costly issues. Here are some essential maintenance tips to keep your lawn mower in top shape.
Regular Inspections
Regular inspections are crucial. Always check the pull cord before each use. Look for any signs of wear or fraying. If the cord seems weak, replace it immediately. This can prevent sudden breakage during operation.
- Check for wear and tear
- Ensure the cord is not frayed
- Replace weak cords promptly
Inspect other parts too. Ensure the blades are sharp and clean. Check the oil level and change it if dirty. Make sure the air filter is clean and replace it if needed. Keeping an eye on these components can save you time and trouble.
| Component | Action |
|---|---|
| Pull Cord | Inspect for wear, replace if weak |
| Blades | Sharpen and clean |
| Oil | Check level, change if dirty |
| Air Filter | Clean or replace |
Proper Storage
Proper storage can extend the life of your lawn mower. Store it in a dry, sheltered place. This protects it from weather damage. Moisture can cause rust and other issues.
- Store in a dry, sheltered place
- Cover the mower if stored outside
- Drain fuel before long-term storage
Cover the mower if you must store it outside. Use a waterproof cover to protect it from rain and snow. For long-term storage, drain the fuel to prevent engine problems. This simple step can save you from costly repairs.
Frequently Asked Questions
How Do I Replace The Pull Cord On My Lawn Mower?
To replace the pull cord, first, remove the starter assembly. Then, remove the old cord, thread a new cord, and reassemble.
What Tools Do I Need To Replace A Pull Cord?
You’ll need a screwdriver, pliers, and a new pull cord. These tools will help you remove and replace the cord effectively.
How Long Does It Take To Replace A Pull Cord?
Replacing a pull cord typically takes around 30 minutes. This time may vary based on your experience and the mower model.
Can I Replace A Pull Cord Myself?
Yes, you can replace a pull cord yourself. With basic tools and some patience, it’s a straightforward DIY task.
Conclusion
Replacing the pull cord on your lawn mower is easier than it sounds. Just follow the steps carefully. Start by removing the old cord. Then, thread the new one through the handle. Secure it tightly. Test the mower to ensure it works.
Regular maintenance keeps your mower in good shape. You can handle this task with simple tools. Save money on repairs by doing it yourself. Your lawn mower will run smoothly again. Keep your lawn looking great all season long. Happy mowing!
