
Replacing a starter solenoid on a lawn mower is simple. It only takes a few steps.
A faulty starter solenoid can keep your lawn mower from starting. This small but vital part helps the engine turn over. Knowing how to replace it can save you time and money. Starter solenoids often wear out due to frequent use.
When the solenoid fails, the mower won’t start. This guide will help you understand the process of replacing a faulty solenoid. You’ll need some basic tools and a bit of patience. By following these steps, you can get your lawn mower back in working order. Let’s dive in and fix that starter solenoid.
Tools And Materials Needed
Replacing a starter solenoid on a lawn mower requires specific tools and materials. Gathering these items beforehand will make the process smoother. Here are the essential tools and required materials you need.
Essential Tools
Having the right tools is crucial. Below is a list of essential tools you will need:
- Screwdrivers – Both flathead and Phillips types
- Socket Wrench Set – Various sizes
- Pliers – Needle-nose or standard
- Multimeter – For checking electrical connections
- Wire Strippers – For handling electrical wires
Required Materials
Besides the tools, you will also need some materials. Gather these items before you start:
- Replacement Starter Solenoid – Ensure it’s compatible with your lawn mower model
- Electrical Tape – For securing connections
- Cleaning Cloth – To clean the area around the solenoid
- Protective Gloves – To keep your hands safe
- Safety Glasses – To protect your eyes
Preparation
Replacing a starter solenoid on a lawn mower can seem daunting. However, with proper preparation, the task becomes more manageable. This section focuses on the steps you need to take before you begin the replacement process.
Safety Precautions
First, ensure you wear protective gloves and safety goggles. These protect your hands and eyes from debris and harmful substances. Next, disconnect the spark plug wire. This prevents the engine from starting accidentally while you work. It is crucial to work in a well-ventilated area. A garage with the door open or an outdoor space works best. Make sure your tools are in good condition. A malfunctioning tool can cause accidents.
Positioning The Lawn Mower
Find a flat, stable surface to place your lawn mower. This ensures the mower stays still during the repair. Engage the parking brake to prevent movement. If your mower doesn’t have a brake, use wheel chocks. These are blocks placed against the wheels to keep them from moving. Raise the mower deck to its highest position. This gives you better access to the solenoid. Make sure you have a clean workspace. Clear away any debris or obstacles that might hinder your movement.
Locating The Starter Solenoid
Replacing a starter solenoid on a lawn mower starts with locating the solenoid. The solenoid is a small but vital part. It controls the flow of electricity from the battery to the starter. Finding it can seem tricky, but with some guidance, it becomes manageable.
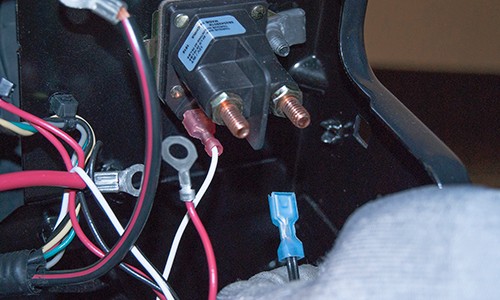
Identifying The Solenoid
The starter solenoid is usually a small cylindrical or rectangular device. It has multiple wires attached to it. These wires are often thick. The solenoid is commonly placed near the battery or the starter motor. It may also be mounted on the mower frame. Knowing its shape and connections helps in spotting it quickly.
Accessing The Solenoid
Once you identify the solenoid, the next step is accessing it. This often involves removing some parts. Below is a simple guide to access the solenoid:
- Turn off the lawn mower. Remove the key from the ignition.
- Disconnect the battery cables. Always disconnect the negative (-) cable first.
- Locate the solenoid. It’s usually near the battery or starter motor.
- Remove any covers or panels blocking access. Use appropriate tools like screwdrivers or wrenches.
- Carefully pull back any wires. Ensure you remember their positions for reassembly.
By following these steps, you can easily access the solenoid. Keep all removed parts in a safe place. This makes reassembly easier.
Removing The Faulty Solenoid
Replacing the starter solenoid on a lawn mower can seem challenging. But with the right guidance, it becomes a simple task. This section focuses on removing the faulty solenoid. It includes steps to disconnect the battery and detach the solenoid wires.
Disconnecting The Battery
Safety is crucial. Start by turning off the lawn mower. Locate the battery, usually under the seat or hood. Use a wrench to loosen the negative terminal first. This prevents short circuits. Then, loosen and remove the positive terminal. Store the battery in a safe place.
| Step | Action |
|---|---|
| 1 | Turn off the lawn mower |
| 2 | Locate the battery |
| 3 | Loosen the negative terminal |
| 4 | Loosen the positive terminal |
| 5 | Store the battery safely |
Detaching The Solenoid Wires
Next, find the starter solenoid. It is often near the engine or battery. There will be two or three wires attached. Use a screwdriver to remove these wires. Remember their positions. You can take a photo for reference. Be gentle to avoid damaging the wires.
- Locate the starter solenoid
- Identify the attached wires
- Use a screwdriver to remove the wires
- Remember the wire positions
- Take a photo for reference
With the battery disconnected and the wires detached, the solenoid is ready for removal. Follow these steps carefully to ensure a smooth process.
Installing The New Solenoid
After removing the old solenoid, it’s time to install the new one. This step is crucial for ensuring your lawn mower starts smoothly. Follow these instructions carefully to avoid any issues.
Connecting The Wires
First, identify the wires connected to the old solenoid. Usually, there are two large terminals and one or two smaller ones. Carefully attach the wires to the corresponding terminals on the new solenoid. Ensure each wire is secure. Loose connections can cause starting problems.
Double-check the wire colors and positions. They should match the old setup. If unsure, refer to your lawn mower’s manual. This helps avoid mistakes and ensures proper functioning.
Securing The Solenoid
Next, position the new solenoid in its place. Use the mounting bolts to secure it. Tighten the bolts with a wrench until they are snug. This keeps the solenoid stable during operation.
Check that the solenoid is firmly attached. A loose solenoid can lead to poor connections or vibrations. This step ensures the solenoid stays in place and works effectively.
Once the solenoid is secure, reconnect the battery. Test the lawn mower to ensure it starts correctly. If it does, your installation is successful.
Reassembling The Lawn Mower
Once you have replaced the starter solenoid on your lawn mower, it’s time to put everything back together. This step is crucial to ensure your mower works smoothly. Follow these guidelines to reassemble your lawn mower correctly.
Reconnecting The Battery
- First, locate the battery compartment. It is usually under the seat or hood.
- Place the battery back in its slot.
- Connect the positive terminal first. Use a wrench to tighten the nut.
- Connect the negative terminal next. Ensure both connections are secure.
Properly reconnecting the battery ensures the electrical system functions well. A loose connection can cause starting issues.
Final Checks
- Inspect all connections. Ensure they are tight and secure.
- Check the solenoid wiring. Make sure it’s properly attached.
- Look for any loose parts or tools left behind.
- Turn the ignition key to test the starter solenoid.
If the engine starts smoothly, your job is complete. If not, recheck all connections. This simple recheck can save you from future issues.
By following these steps, you can reassemble your lawn mower and ensure it is ready for use. Remember to always work in a safe environment and use the correct tools for the job.
Testing The Installation
After replacing the starter solenoid on your lawn mower, it’s crucial to test the installation. This ensures the solenoid functions correctly and your mower starts without issues. Follow these steps to test the installation effectively.
Starting The Lawn Mower
First, reconnect the battery and turn the key to the start position. Listen for the sound of the engine turning over. If the engine starts smoothly, the installation was successful.
If the mower does not start, check the connections to the solenoid. Ensure all wires are tightly connected and there is no corrosion. Sometimes, a loose wire can prevent the engine from starting.
Troubleshooting Common Issues
Even with careful installation, issues can arise. Here are some common problems and solutions:
- Clicking Sound: If you hear a clicking sound but the engine doesn’t start, the battery might be low. Charge the battery and try again.
- No Sound: If there is no sound when you turn the key, the solenoid may not be receiving power. Check the fuse and ensure all connections are secure.
- Engine Starts Then Stops: If the engine starts but then stops, it could be a fuel issue. Check the fuel level and ensure the fuel line is not clogged.
These steps should help identify and resolve common problems with the starter solenoid installation.

Maintenance Tips
Replacing a starter solenoid on a lawn mower is simple. First, disconnect the battery. Next, locate and remove the old solenoid. Finally, install the new solenoid and reconnect the battery.
Maintaining your lawn mower’s starter solenoid can extend its life. Keeping up with regular maintenance ensures your mower starts smoothly every time. Follow these tips to keep your solenoid in top shape.Regular Inspection
Check the starter solenoid regularly. Look for signs of wear and tear. Inspect the wiring connections for any corrosion. Clean the connections if necessary. Make sure the solenoid is securely mounted. Loose mounting can cause problems.Prolonging Solenoid Life
Keep the solenoid free from dirt and debris. Clean it regularly with a dry cloth. Avoid using water or chemicals. Ensure your lawn mower is stored in a dry place. Moisture can damage the solenoid. Use your mower as per the manufacturer’s guidelines. Overloading the mower can strain the solenoid. Conduct regular maintenance on other mower parts too. A well-maintained mower helps the solenoid function better. “`
Frequently Asked Questions
What Is A Starter Solenoid?
A starter solenoid is an electromechanical switch. It engages the starter motor to crank the engine. It is crucial for starting your lawn mower.
How Do I Know If My Solenoid Is Bad?
Signs of a bad solenoid include a clicking sound, no engine response, or intermittent starting issues. Testing with a multimeter can confirm.
What Tools Do I Need To Replace A Solenoid?
You’ll need a socket set, wrenches, screwdrivers, and a multimeter. Having the lawn mower’s manual can be helpful too.
Can I Replace A Solenoid Myself?
Yes, you can replace a solenoid yourself. Follow the steps in your lawn mower’s manual. Ensure safety by disconnecting the battery first.
Conclusion
Replacing a starter solenoid on a lawn mower is straightforward. Follow the steps carefully. Ensure safety by disconnecting the battery first. Use the right tools to avoid damage. Double-check all connections before testing. A functioning starter solenoid ensures a smoothly running mower.
Regular maintenance can prevent future issues. Feel confident tackling this task yourself. Happy mowing!
