
To remove a lawn mower spark plug, you need some basic tools. It’s a simple task that can help keep your lawn mower running smoothly.
In this guide, we will explain how to remove a lawn mower spark plug step-by-step. Spark plugs are small but crucial parts of your mower’s engine. They ignite the fuel, enabling the mower to run. Over time, spark plugs can wear out or get dirty, causing engine problems.
Knowing how to remove and inspect them can save you time and money. Whether you are a beginner or an experienced gardener, this guide will provide clear and easy instructions. Let’s get started and ensure your lawn mower stays in top shape.
Tools Needed
Removing a lawn mower spark plug is a simple task if you have the right tools. Proper tools ensure the job is done efficiently and safely. This guide will walk you through the essential tools and safety gear needed for the task.
Essential Tools
Before you begin, gather the necessary tools. Here’s a list of essential tools:
- Spark Plug Socket: A specialized socket wrench designed for spark plugs. Typically, you’ll need a 5/8″ or 13/16″ size.
- Socket Wrench: Used with the spark plug socket to remove and install the spark plug.
- Gap Gauge: Ensures the spark plug gap is correct, which is crucial for proper engine function.
- Extension Bar: Helps reach the spark plug if it’s in a tight or recessed area.
Safety Gear
Safety is paramount when working with lawn mower engines. Make sure you have the following safety gear:
- Safety Glasses: Protects your eyes from debris and accidental sparks.
- Work Gloves: Keeps your hands safe from sharp edges and hot surfaces.
- Ear Protection: If the engine is running, protect your ears from loud noises.
| Tool | Purpose |
|---|---|
| Spark Plug Socket | To remove/install spark plug |
| Socket Wrench | Works with spark plug socket |
| Gap Gauge | Ensures correct spark plug gap |
| Extension Bar | Reaches tight spaces |
Having these tools and safety gear ready will make the process smooth and efficient. Always prioritize safety to avoid injuries.
Preparation
Removing a lawn mower spark plug is simple. Proper preparation ensures safety and efficiency. Follow these steps to ensure a smooth process.
Turn Off The Mower
First, make sure the lawn mower is turned off. Disconnect the power source if it’s electric. For gas mowers, remove the key and turn off the fuel valve. This prevents accidental starts.
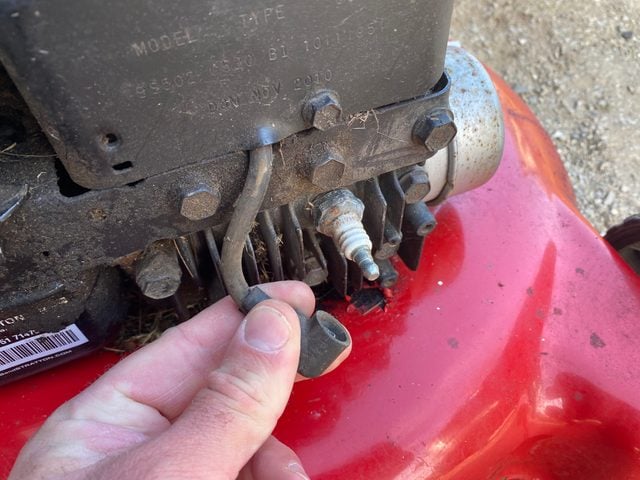
Locate The Spark Plug
Next, locate the spark plug. It’s usually on the side or top of the engine. Look for a thick black wire. This wire connects to the spark plug. You may need to remove a cover to access it.
Removing The Spark Plug
Removing the spark plug from your lawn mower is essential for maintenance. This simple task can keep your mower running smoothly. Follow these steps for a hassle-free spark plug removal.
Disconnect The Spark Plug Wire
First, locate the spark plug wire. It connects the spark plug to the ignition coil. Gently pull the boot at the end of the wire. Do not yank the wire itself. This can damage the wire or the connection. Use a firm, steady motion. The boot should pop off easily.
Use A Spark Plug Wrench
Now, take your spark plug wrench. This tool is designed for this task. Place it over the spark plug. Turn the wrench counterclockwise. This loosens the spark plug. Continue turning until you can remove the spark plug by hand. Inspect the spark plug. Look for signs of wear or damage. Replace if needed.
Cleaning The Spark Plug
Cleaning the spark plug of your lawn mower is essential. A clean spark plug ensures optimal performance and longevity of your mower. This section will guide you through inspecting and cleaning the spark plug effectively.
Inspect For Damage
Before cleaning, always check the spark plug for any signs of damage. Look for cracks, chips, or wear on the ceramic insulator. Examine the electrode for any signs of burning or corrosion.
- If the spark plug is damaged, replace it immediately.
- A damaged spark plug can cause your mower to malfunction.
Clean With A Brush
Once you’ve inspected the spark plug and confirmed it’s not damaged, proceed to clean it. Use a wire brush or a spark plug cleaner to remove carbon buildup and debris from the electrode and insulator.
- Hold the spark plug firmly.
- Scrub the electrode and insulator with the brush.
- Ensure all debris is removed for a clean surface.
A clean spark plug guarantees a smooth start and efficient running of your lawn mower.
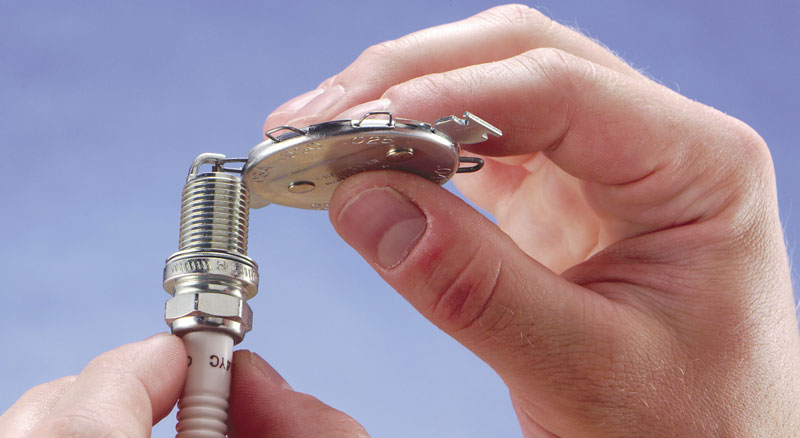
Checking The Spark Plug Gap
Ensuring the spark plug gap is correct is crucial for your lawn mower’s performance. An incorrect gap can cause poor engine performance, misfires, or even damage. Checking and adjusting the spark plug gap is a simple process that can make a significant difference.
Use A Gap Gauge
First, you need a gap gauge. This tool measures the distance between the center and ground electrodes of the spark plug.
- Remove the spark plug from the engine.
- Insert the gap gauge into the gap between the electrodes.
- Check the measurement against your lawn mower’s specifications.
Manufacturers provide the correct gap size in the owner’s manual. Always follow these specifications for the best results.
Adjust The Gap
If the gap is incorrect, you need to adjust it. Use the gap gauge’s built-in tool or a small tool like needle-nose pliers.
- To widen the gap: Gently bend the ground electrode away from the center electrode.
- To narrow the gap: Gently bend the ground electrode toward the center electrode.
Recheck the gap with the gauge. Repeat the adjustment until the gap matches the specified measurement.
With the correct spark plug gap, your lawn mower will run more efficiently. Proper maintenance can extend the life of your engine.
Reinstalling The Spark Plug
Reinstalling the spark plug in your lawn mower is an important step. It ensures that your mower runs smoothly. Follow these simple steps to make sure you do it right.
Hand-tighten The Plug
Start by inserting the spark plug into the hole. Turn it clockwise by hand. This helps to avoid cross-threading. Keep turning until you feel it snug.
Secure With A Wrench
Next, use a wrench to tighten the plug. Place the wrench on the spark plug. Turn it clockwise. Do not over-tighten. Just make it secure. This ensures a good connection.
Check that the plug is tight but not too tight. Your lawn mower is now ready to use. Following these steps helps to maintain your mower well.
Reconnecting The Spark Plug Wire
After removing the spark plug, it’s time to reconnect the wire. This step is crucial for your lawn mower to function properly. A secure connection ensures the engine starts smoothly and runs efficiently. Let’s go through the process of reconnecting the spark plug wire.
Attach The Wire
First, locate the spark plug wire. It’s the thick black wire near the engine. Hold the end of the wire firmly. Align it with the top of the spark plug. Push the wire onto the spark plug. You should feel a slight resistance. This indicates the wire is attaching correctly.
Ensure A Firm Connection
Next, ensure the wire is firmly connected. Wiggle the wire gently. It should not come off easily. Check for any gaps between the wire and the spark plug. A firm connection prevents engine misfires. It also improves the lawn mower’s overall performance.
Reconnecting the spark plug wire is simple yet vital. Following these steps ensures your lawn mower runs smoothly.
Testing The Mower
After removing and replacing the spark plug, it’s vital to test the mower. This ensures the machine runs smoothly and efficiently. Testing the mower involves a few simple steps. Here’s how you can do it effectively.
Start The Mower
First, position the mower on a flat surface. Ensure the fuel tank is full. Place your hand on the starter handle. Pull it swiftly to start the engine. Listen to the sound of the engine.
Check For Smooth Operation
Once the engine starts, check for smooth operation. Listen for any odd noises. The engine should run steadily without hiccups. Walk the mower over a small patch of grass. Observe how it cuts. Ensure the blades are functioning well.
| Step | Description |
|---|---|
| Position the mower | Place on flat surface |
| Fill the fuel tank | Ensure it’s full |
| Start the engine | Pull the starter handle |
| Check operation | Listen and observe |
If the mower runs smoothly, the spark plug replacement was successful. If not, revisit the steps. Ensure the spark plug is correctly fitted. Regular maintenance ensures a long life for your mower.
Frequently Asked Questions
How Do I Locate The Spark Plug?
To locate the spark plug, check your lawn mower’s manual. Typically, it’s found on the engine’s side or top.
What Tools Do I Need To Remove A Spark Plug?
You will need a spark plug socket, a ratchet, and possibly a wrench. Always check your mower’s manual for specific tools.
Is It Necessary To Disconnect The Mower Battery?
Yes, it’s a good safety practice to disconnect the battery before removing the spark plug to avoid accidental starts.
How Often Should I Replace The Spark Plug?
Replace the spark plug at least once a season or after 25 hours of use. Check your manual for specific recommendations.
Conclusion
Removing a lawn mower spark plug is easier than you think. Follow the steps and you’ll do it safely. First, gather your tools. Next, locate the spark plug. Then, disconnect the wire and use a wrench to remove the plug.
Check for damage and replace if needed. Reattach the wire, and you’re done. Regular maintenance keeps your mower running smoothly. Save time and money by doing it yourself. Happy mowing!
