Hooking up a lawn mower battery is simple. You need a few basic tools.
A lawn mower is essential for a well-kept yard. But when the battery dies, it can be a hassle. Learning how to connect a new battery can save you time and money. This guide will walk you through the steps to get your mower running smoothly.
We will cover the tools needed, safety tips, and a step-by-step process. Whether you are a seasoned gardener or new to lawn care, this guide will make it easy. Get ready to power up your mower and keep your lawn looking great!
Preparation Steps
Getting your lawn mower ready for battery installation is crucial. Proper preparation ensures a smooth and safe process. Follow these steps to gather the right tools and take necessary safety measures.
Gather Tools
First, collect all the tools you need. You will need a wrench, screwdriver, and protective gloves. Ensure the tools are clean and in good condition. Having all tools handy saves time and effort.
Safety Measures
Safety is very important. Wear gloves to protect your hands. Work in a well-ventilated area. Keep children and pets away from the workspace. Disconnect the spark plug to avoid accidental starts. These steps ensure your safety while working.
Identify Battery Type
Identifying the battery type for your lawn mower is crucial. It ensures the correct connection and optimal performance. Each type of battery has unique characteristics and specifications.
Lead-acid Vs. Lithium-ion
Lead-acid batteries are common in many lawn mowers. They are reliable and cost-effective. These batteries require regular maintenance, like checking fluid levels.
Lithium-ion batteries are newer and more efficient. They are lightweight and require less maintenance. They also have a longer lifespan compared to lead-acid batteries.
Reading Specifications
Always read the battery’s specifications before purchase. The specifications will tell you the voltage and capacity. This ensures compatibility with your lawn mower.
The user manual often provides the necessary battery type and specifications. Check the manual for the recommended battery type. This helps avoid any issues during installation.
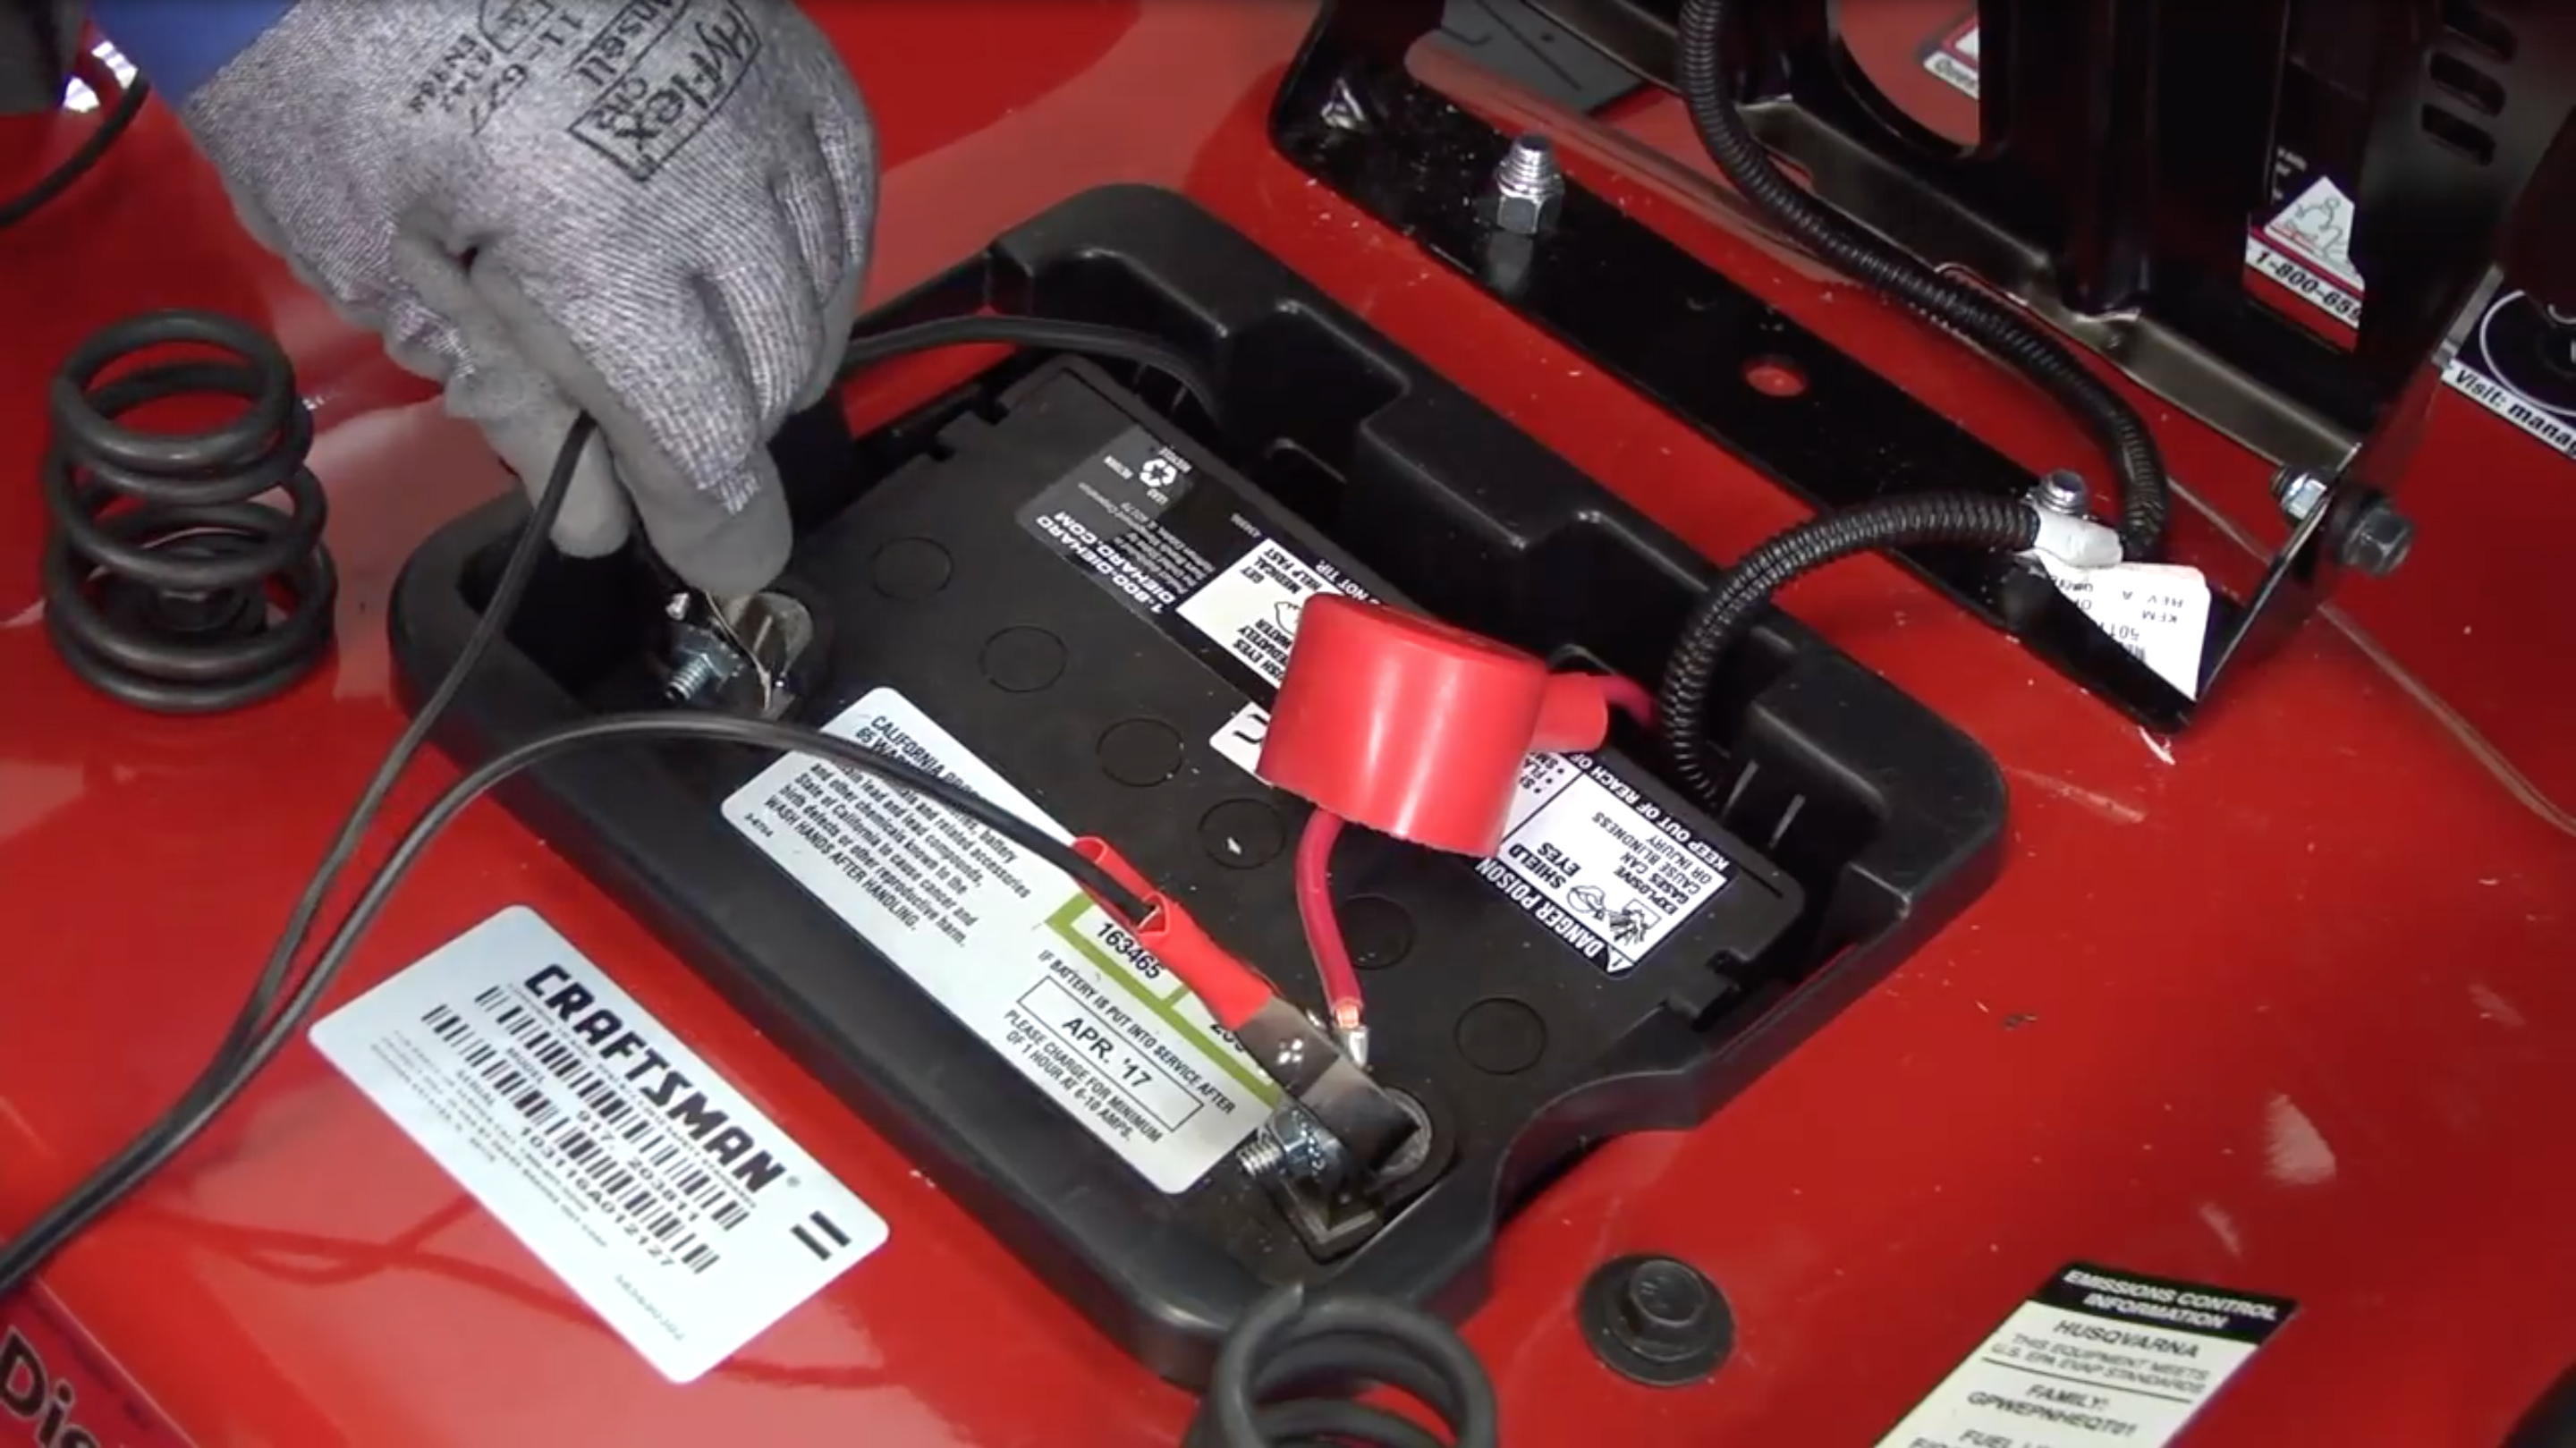
Locate The Battery Compartment
Before you can power up your lawn mower, you need to locate the battery compartment. This step is crucial for a smooth and efficient setup. Knowing where the battery is housed can save you a lot of time and effort.
Manual Reference
Always start by checking the user manual of your lawn mower. The manual usually provides detailed instructions and diagrams. Look for the section that talks about the battery or electrical system. This will give you a clear idea of where to find the battery compartment.
Common Locations
Battery compartments are often placed in accessible areas. Here are some common spots you might find them:
- Under the seat
- Near the engine
- At the rear of the mower
For riding mowers, the battery is often located under the seat. Lift the seat to reveal the compartment. For push mowers, check the area near the engine. The battery might be housed in a small compartment with a cover.
| Lawn Mower Type | Battery Location |
|---|---|
| Riding Mower | Under the seat |
| Push Mower | Near the engine |
Once you locate the compartment, open it carefully. Make sure you have the right tools, like a screwdriver, to access the battery. This step is vital for connecting the battery correctly.
Disconnect Old Battery
Disconnecting the old battery is the first step in installing a new lawn mower battery. This process ensures you can safely remove the old battery without causing damage. Follow these steps to disconnect the old battery efficiently.
Removing Cables
Start by turning off the lawn mower. Locate the battery compartment. Use a wrench to loosen the nut on the negative cable. Remove the negative cable first. This prevents accidental sparks. Next, loosen the nut on the positive cable. Remove the positive cable. Keep the cables away from the battery terminals.
Handling Precautions
Wear gloves to protect your hands. Use safety glasses to shield your eyes. Batteries contain acid. Handle them with care. Avoid touching your face while working. Place the old battery in a safe location. Dispose of it properly. Follow local guidelines for battery disposal. Never throw it in the trash.
Install New Battery
Installing a new battery in your lawn mower is an essential task. It ensures your mower runs smoothly. Follow these simple steps to get the job done right.
Positioning Correctly
Before positioning the battery, check the mower’s manual. This will guide you on the proper placement. Place the battery in the designated slot. Make sure the terminals face the correct direction. Usually, the positive terminal is marked with a plus sign (+). The negative terminal is marked with a minus sign (-).
Securing Battery
After positioning the battery, it’s time to secure it. Use the straps or brackets provided by the manufacturer. Tighten the straps to keep the battery from moving. Ensure that it is snug but not overly tight. You don’t want to damage the battery or its components.
Next, connect the terminals. Attach the positive terminal first. This is important for safety. Tighten the clamp to ensure a secure connection. Then, connect the negative terminal. Again, tighten the clamp to secure it.
Double-check all connections. Make sure they are tight and secure. A loose connection can cause starting issues. Properly securing the battery ensures it functions well and lasts longer.

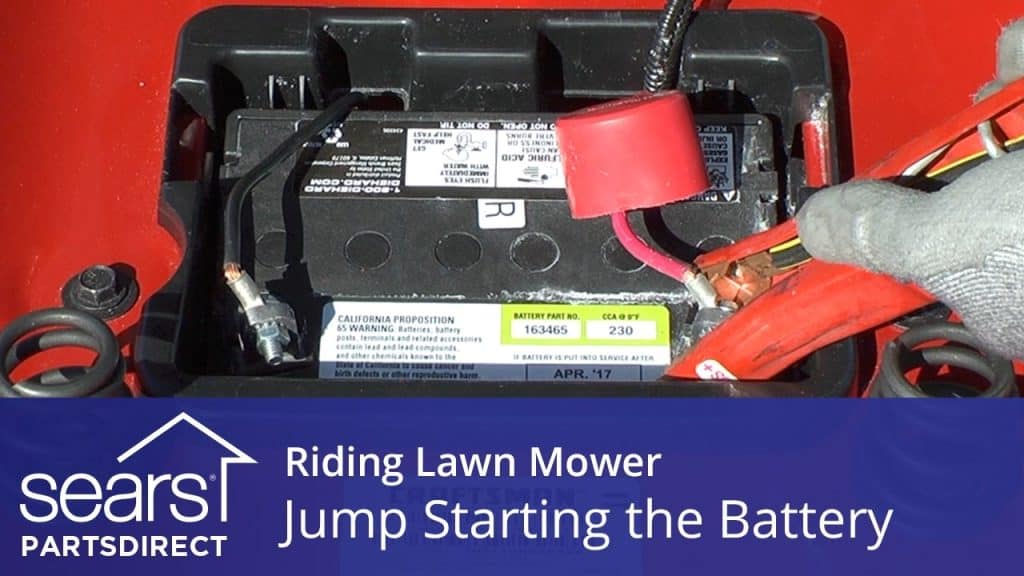
Connect Battery Terminals
Connecting the battery terminals of your lawn mower is crucial. This ensures your mower starts smoothly and runs efficiently. Follow these steps carefully to avoid any mistakes.
Positive First
Always connect the positive terminal first. Locate the positive terminal on your battery. It is usually marked with a plus sign (+). Attach the red cable to this terminal. Ensure it is firmly in place before moving on.
Tightening Connections
Securely tighten the connections. Use a wrench to tighten the bolts on the terminals. The connections should be snug but not overly tight. Loose connections can cause starting problems. Over-tightening can damage the battery. Check that both the positive and negative terminals are secure.
Check Battery Installation
After connecting your lawn mower battery, it’s crucial to check the installation. This ensures your mower functions efficiently and safely. A poorly installed battery can lead to issues. It can even damage your mower.
To avoid this, inspect the battery connections. Then, test its functionality. These steps ensure your battery is correctly installed and working well.
Inspect Connections
Start by inspecting the battery connections. Look for any loose or corroded terminals. Loose connections can cause power issues. Corroded terminals can lead to poor performance.
Use a wrench to tighten any loose terminals. Clean any corrosion with a wire brush. Ensure the connections are secure. This will help maintain a steady power supply.
Test Functionality
Next, test the battery’s functionality. Turn on your lawn mower. Listen for any unusual sounds. If the mower starts smoothly, the battery is likely well-connected.
If the mower struggles to start, recheck the connections. Ensure they are tight and clean. Testing ensures your battery installation is correct.

Maintenance Tips
Keeping your lawn mower battery in top condition ensures a smooth start every time. Proper maintenance can extend the battery’s life. It also prevents unexpected breakdowns. Regular care and attention can save you time and money in the long run.
Regular Inspection
Check your battery regularly. Look for signs of corrosion on the terminals. Clean any dirt or debris from the battery. Use a wire brush to remove corrosion. Ensure the connections are tight. Loose connections can cause poor performance. Inspect the battery case for cracks or bulges. Replace the battery if you notice any damage.
Proper Storage
Store your lawn mower in a cool, dry place. Avoid leaving the battery in the mower during winter. Cold temperatures can damage the battery. Remove the battery and store it indoors. Keep it away from direct sunlight and moisture. Charge the battery fully before storing it. Check the battery charge every few weeks. Recharge it if the voltage drops.
Frequently Asked Questions
How Do You Connect A Lawn Mower Battery?
To connect a lawn mower battery, attach the positive cable first, followed by the negative cable. Ensure the connections are tight and secure. Always wear protective gear.
What Tools Are Needed For Battery Installation?
You need a wrench, gloves, and safety glasses. These tools ensure safe and proper battery installation. Proper equipment prevents accidents and ensures secure connections.
Can You Use Any Battery For A Lawn Mower?
No, you must use a battery compatible with your lawn mower’s specifications. Check the manual for the correct battery type. Using the wrong battery can damage your mower.
How Often Should You Replace A Lawn Mower Battery?
Replace your lawn mower battery every 3-5 years. Regular maintenance and proper storage can extend battery life. Always monitor battery performance.
Conclusion
Connecting a lawn mower battery is simple and essential. Follow the steps outlined. Ensure safety by wearing gloves. Double-check the battery connections. Properly maintained, your mower will last longer. Regular battery checks can prevent issues. Enjoy your well-kept lawn with ease.
Happy mowing!
