Removing a lawn mower blade can seem daunting. But it is simpler than you think.
A well-maintained lawn mower ensures a clean, even cut every time. Over time, blades can dull, affecting performance. Knowing how to remove the blade is a crucial skill for any lawn enthusiast. It saves money on repairs and keeps your mower in top shape.
This guide will walk you through the process step-by-step. You will learn the tools needed and safety tips to follow. By the end, you will confidently remove and replace your lawn mower blade. Let’s get started and keep that lawn looking its best!
Preparing For Blade Removal
Removing a lawn mower blade requires some preparation. This ensures the process is smooth and safe. Before starting, gather the necessary tools and follow safety precautions. This guide will help you through the steps.
Gather Necessary Tools
First, collect all the tools you will need. You will need a wrench, a pair of gloves, and a block of wood. Get a socket set and a blade removal tool if possible. These tools make the job easier and faster.
Ensure Safety Precautions
Safety is very important. Before you start, disconnect the spark plug wire. This prevents the mower from starting accidentally. Wear gloves to protect your hands from sharp edges. Use a sturdy block of wood to prevent the blade from moving. This keeps the blade steady while you work.
Clear the area around your mower. Ensure there are no distractions. Make sure you have good lighting so you can see clearly. Being careful can prevent injuries and damage.
Positioning The Lawn Mower
Removing the blade from your lawn mower requires proper positioning. This is key for safety and efficiency. First, make sure the mower is on a flat, stable surface. A driveway or garage floor works well. This prevents the mower from tipping over during the process. Also, clear the area of any debris or obstacles. This ensures a smooth operation.
Disconnect Spark Plug
Before you tilt the mower, disconnect the spark plug. This prevents accidental starts. Locate the spark plug wire. It’s usually near the front of the mower. Pull the wire off the plug. This step is crucial for your safety. Always handle the mower with the spark plug disconnected.
Tilt Lawn Mower Safely
Now, it’s time to tilt the mower. Tilt it to one side. This gives you access to the blade. Ensure the gas tank is on the higher side. This prevents fuel leakage. Use a block or stand to support the mower. This keeps it stable while you work. Safety first. Always.
Securing The Blade
Removing a lawn mower blade can be tricky without properly securing the blade. Ensuring the blade doesn’t move is crucial for safety and efficiency. Here’s how you can secure the blade effectively.
Use A Block Of Wood
First, use a sturdy block of wood to secure the blade. Place the wood between the blade and the deck of the mower. This will stop the blade from turning while you work.
Prevent Blade Movement
Next, you must prevent blade movement to avoid accidents. Wear gloves to protect your hands. Hold the blade firmly or use a clamp if needed. Make sure the blade is completely still before you begin to loosen the bolt.
| Step | Details |
|---|---|
| 1 | Use a block of wood to stop blade rotation. |
| 2 | Wear gloves to protect your hands. |
| 3 | Hold the blade firmly or use a clamp. |
Follow these steps to ensure your safety while working. Remember, securing the blade is the first step to safely remove it.

Loosening The Blade Bolt
Removing the blade from your lawn mower is a simple task. The first step involves loosening the blade bolt. This step can seem tricky, but with the right tools and technique, it becomes straightforward. Here’s how you do it.
Select Correct Wrench
First, you need the right tool. A proper wrench makes all the difference. Check your lawn mower’s manual to know the bolt size. Usually, a 5/8-inch or 9/16-inch wrench fits most mowers. Ensure the wrench is in good condition for a firm grip.
If you don’t have the manual, you can measure the bolt. Use a caliper or a ruler. Having the correct size prevents slipping and damage.
Turn Bolt Counterclockwise
Once you have the wrench, position it on the blade bolt. Make sure the wrench is secured tightly. Now, you need to turn the bolt counterclockwise. This direction loosens the bolt.
Sometimes, the bolt might be very tight. In such cases, use a penetrating oil. Spray it on the bolt and wait for a few minutes. This oil helps in loosening stuck bolts.
For better leverage, use a cheater bar. This is a long pipe that fits over the wrench handle. It provides extra force and makes turning easier.
Remember, safety comes first. Always wear gloves to protect your hands from sharp edges.
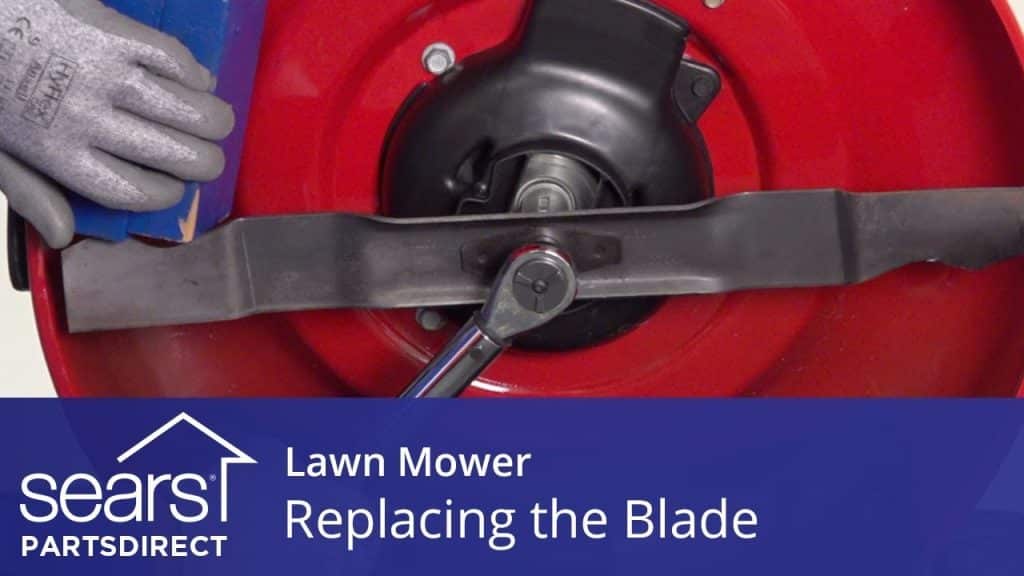
Removing The Blade
Removing the lawn mower blade is a crucial task for maintenance. A sharp blade ensures a clean cut, which is vital for a healthy lawn. Before you start, ensure the mower is off and the spark plug is disconnected. This prevents accidental starts. Gather your tools: wrench, gloves, and a wooden block. Now, let’s dive into the steps to remove the blade.
Slide Blade Off
First, tilt the mower on its side. Ensure the air filter faces up to prevent oil leakage. Place a block of wood between the blade and the mower deck. This keeps the blade from moving. Use a wrench to loosen the bolt holding the blade. Turn the bolt counterclockwise. Once the bolt is loose, slide the blade off the mower’s shaft.
Inspect Blade And Bolts
After removing the blade, inspect it carefully. Look for nicks, bends, or dull edges. A damaged blade can harm your lawn. If the blade is in bad shape, consider replacing it. Next, check the bolts. Ensure they are not stripped or damaged. Clean the bolts with a wire brush if needed. This ensures a secure fit when reassembling.

Cleaning And Maintenance
Cleaning and maintaining your lawn mower blade is crucial for a healthy lawn. A clean blade ensures a smooth cut and prevents damage to your grass. Regular maintenance can extend the life of your mower and keep it running efficiently.
Clean Blade Area
Before you start cleaning, disconnect the spark plug for safety. Turn the mower on its side, with the air filter facing up. This prevents oil and gas from spilling. Use a stiff brush or scraper to remove grass and debris from the blade area. Wear gloves to protect your hands from sharp edges. Clean the underside of the mower deck as well. This helps prevent rust and keeps your mower in good condition.
Check For Damage
Inspect the blade for any signs of wear or damage. Look for cracks, bends, or chips. A damaged blade can cause uneven cuts and stress on the mower engine. If the blade is dull, sharpen it using a file or grinding tool. Balance the blade by ensuring it hangs evenly on a nail. If the blade is beyond repair, replace it with a new one. Always follow the manufacturer’s instructions for blade replacement.
Installing The New Blade
Installing the new blade on your lawn mower is a crucial step. A well-installed blade ensures efficient mowing and long-lasting performance. This section will guide you through the process of installing the new blade properly. Follow these simple steps to achieve the best results.
Align Blade Properly
First, position the new blade onto the mower. Make sure the blade’s cutting edges face the correct direction. Align the blade with the mounting holes on the mower. This alignment is crucial for balanced and efficient mowing.
Tighten Blade Bolt
Next, insert the blade bolt through the mounting hole. Use a wrench to tighten the bolt securely. Hold the blade steady with one hand while tightening. Ensure the bolt is tight enough to prevent any wobbling or movement. A secure blade ensures safe and effective mowing.

Final Checks
After successfully removing and replacing the lawn mower blade, it is crucial to perform some final checks. These steps ensure your lawn mower works safely and efficiently. This section will guide you through the necessary final checks to take before you start mowing again.
Reconnect Spark Plug
First, you need to reconnect the spark plug. This is essential for the mower to start. Follow these simple steps:
- Locate the spark plug wire.
- Firmly push the wire onto the spark plug.
- Ensure it is securely attached and there is no loose connection.
Double-check the connection to avoid any starting issues. A loose spark plug wire can prevent the mower from starting.
Test Lawn Mower
After reconnecting the spark plug, it is time to test your lawn mower. Follow these steps to ensure everything is in order:
- Place the mower on a flat surface.
- Start the mower by pulling the starter cord or turning the key.
- Listen for any unusual sounds.
- Check the blade rotation for smoothness.
If the mower starts smoothly and there are no unusual sounds, your final checks are complete. If there are issues, recheck the blade installation and spark plug connection.
Performing these final checks ensures your lawn mower is ready for use and operates safely.
Frequently Asked Questions
How Do I Safely Remove A Lawn Mower Blade?
To safely remove a lawn mower blade, disconnect the spark plug, wear gloves, and use a wrench to unscrew the blade bolt.
What Tools Are Needed To Remove A Mower Blade?
You will need a wrench, gloves, and a wooden block to remove a mower blade.
How Often Should I Change My Lawn Mower Blade?
Change your lawn mower blade at least once a year, or more frequently if it shows signs of wear.
Can I Sharpen My Lawn Mower Blade Instead Of Replacing It?
Yes, you can sharpen your lawn mower blade using a file or grinder, but replace it if it’s damaged.
Conclusion
Removing a lawn mower blade is a simple task. Just follow the steps carefully. Always ensure safety by disconnecting the spark plug. Use the right tools for the job. Remember to note the blade’s position before removal. Clean the blade and mower deck regularly.
This helps maintain your lawn mower’s efficiency. Reattach the blade securely, ensuring it is tight. Proper maintenance extends the mower’s life. Happy mowing!
