
Testing a lawn mower starter with a multimeter is essential for troubleshooting. This helps you determine if the starter is working properly or needs replacement.
Lawn mowers are vital for keeping your yard in top shape. But, like all machines, they sometimes run into issues. A faulty starter can leave you with a mower that won’t start. Knowing how to test the starter can save you time and money.
A multimeter is a handy tool for this task. It measures electrical values and helps find problems. This guide will walk you through the steps to test your lawn mower starter with a multimeter. You’ll learn how to identify issues and ensure your mower runs smoothly. Let’s dive in and make sure your lawn mower is ready for action!
Safety Precautions
Testing a lawn mower starter with a multimeter involves several steps. Ensure safety by wearing protective gloves and disconnecting the battery. Keep the work area clean and dry to avoid accidents.
Testing a lawn mower starter with a multimeter involves electrical components. Safety is critical. Taking the right precautions ensures you avoid injuries and damage. Follow these guidelines for a safe testing experience.Personal Protective Equipment
Wear safety gloves to protect your hands from sharp edges. Safety glasses shield your eyes from debris and sparks. Closed-toe shoes prevent foot injuries. These basic protective measures can make a big difference.Preparing The Work Area
Clear the area of any clutter. A tidy workspace reduces the risk of tripping and falling. Ensure good lighting so you can see clearly. Keep a fire extinguisher nearby. You never know when an electrical spark might ignite something. Disconnect the lawn mower from any power source. Remove the spark plug to prevent accidental starts. Place all tools within easy reach to avoid unnecessary movements. This preparation helps maintain focus and safety throughout the task. “`
Understanding The Lawn Mower Starter
The lawn mower starter is a crucial part of the engine. Its main job is to start the mower by engaging the engine. Without a working starter, your mower won’t run. Knowing how to test the starter can save time and money.
Components Of The Starter
The starter has several key parts. These include:
- Starter Motor: Turns the engine over to start it.
- Solenoid: Acts as a switch to send power to the starter motor.
- Battery: Provides the power needed for the starter.
Each part plays a vital role in starting the mower. If one part fails, the whole system may not work.
Common Starter Issues
Several problems can affect the starter. Here are some common issues:
- Dead Battery: No power to start the engine.
- Faulty Solenoid: Prevents power from reaching the starter motor.
- Worn-out Starter Motor: Cannot turn the engine over.
Knowing these issues helps in diagnosing the problem. Using a multimeter can confirm if these parts are working properly.
Setting Up The Multimeter
Setting up the multimeter is the first step in testing your lawn mower starter. A multimeter is a tool used to measure electrical values. It helps you understand if the starter is working properly. Follow these steps to set up your multimeter correctly.
Choosing The Right Multimeter
Start by choosing the right multimeter. You can find digital and analog multimeters. Digital ones are easier to read. They show numbers on a screen. Analog ones have a needle that moves. For beginners, a digital multimeter is the best choice.
Calibrating The Multimeter
Next, calibrate your multimeter. Turn the dial to the correct setting. For testing a starter, use the DC voltage setting. This setting often has a “V” symbol with a straight line. Make sure the leads are connected properly. The black lead goes into the COM port. The red lead goes into the VΩmA port.
Check if the multimeter is working. Touch the leads together. The multimeter should show zero or a small number. If it does, your multimeter is ready to use.

Testing The Battery
Testing the lawn mower starter begins with the battery. A weak or dead battery can prevent the starter from working. Using a multimeter, you can easily check the battery’s health.
Checking Battery Voltage
To check the battery voltage, follow these steps:
- Turn off the lawn mower and remove the battery.
- Set your multimeter to DC voltage.
- Connect the red probe to the battery’s positive terminal.
- Attach the black probe to the negative terminal.
- Read the voltage on the multimeter display.
A fully charged battery should read around 12.6 volts. If the voltage is much lower, the battery may be the issue.
Interpreting Battery Test Results
Different voltage readings can tell you a lot about your battery’s condition:
| Voltage | Battery Condition |
|---|---|
| 12.6V or higher | Fully charged |
| 12.4V – 12.6V | Partially charged |
| 12.2V – 12.4V | Low charge |
| Below 12.2V | Needs charging or replacement |
If the battery voltage is low, try charging the battery. After charging, test the voltage again. If it remains low, consider replacing the battery.
Testing the battery is a quick and straightforward step. It helps ensure your lawn mower starts correctly.
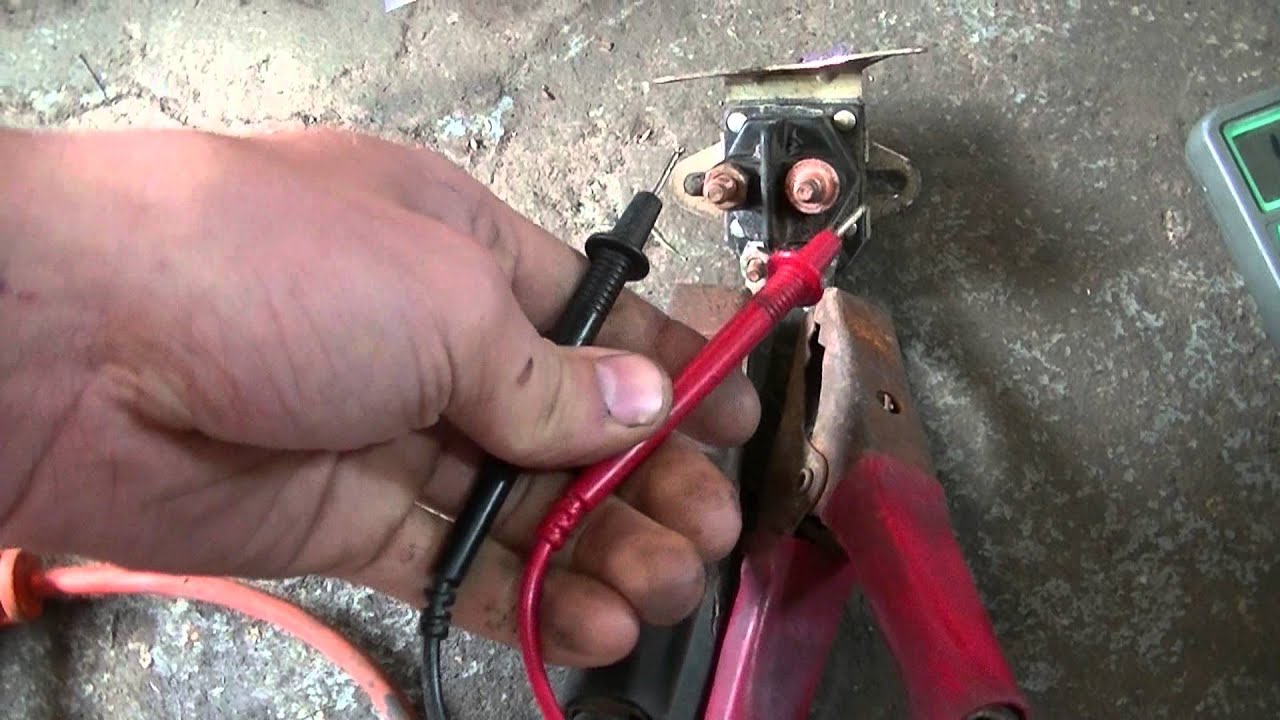
Testing The Starter Solenoid
Testing the starter solenoid of a lawn mower is crucial. It helps determine if your mower’s starting problems are due to a faulty solenoid. Using a multimeter to test the solenoid can save you time and money. Here’s a detailed guide on how to perform this test.
Locating The Solenoid
First, you need to locate the starter solenoid. It is usually near the battery and the starter motor. The solenoid is a small cylindrical or box-shaped component. It has two large wires connected to it.
Follow these steps to locate the solenoid:
- Turn off the lawn mower and remove the key.
- Disconnect the battery to ensure safety.
- Look for the solenoid near the engine or the battery compartment.
- Identify the solenoid by its shape and the wires connected to it.
Once you have found the solenoid, you are ready to test it.
Conducting The Solenoid Test
To test the solenoid, you will use a multimeter. Set the multimeter to the resistance setting (ohms).
Here’s how to conduct the solenoid test:
- Connect the multimeter probes to the solenoid terminals.
- One probe goes on the terminal connected to the battery.
- The other probe goes on the terminal connected to the starter motor.
- Check the multimeter reading.
A good solenoid should have a very low resistance. If the reading is high or infinite, the solenoid is faulty. This means it needs to be replaced.
Here’s a quick reference table:
| Multimeter Reading | Solenoid Condition |
|---|---|
| Low Resistance | Good |
| High/Infinite Resistance | Faulty |
Testing the starter solenoid with a multimeter is a simple process. It helps you quickly diagnose starting issues with your lawn mower.
Testing The Starter Motor
Testing the starter motor of your lawn mower can save you from unnecessary repairs. A multimeter helps you diagnose issues with the starter motor quickly. Follow these steps to ensure your lawn mower is in good working order.
Accessing The Starter Motor
To test the starter motor, you need to access it first. Here’s how you can do it:
- Ensure the lawn mower is turned off and disconnect the spark plug.
- Locate the starter motor, usually near the engine. Refer to your mower’s manual if needed.
- Remove any covers or shields that may be in the way. Use a screwdriver to unscrew bolts if necessary.
Performing The Motor Test
Once you have accessed the starter motor, it’s time to test it using a multimeter.
- Set your multimeter to the DC voltage setting.
- Connect the multimeter probes to the starter motor terminals. The red probe goes to the positive terminal, and the black probe goes to the negative terminal.
- Turn on the lawn mower’s ignition switch without starting the engine. You should see a voltage reading between 12V to 14V. If the reading is lower, the starter motor may be faulty.
If the multimeter shows a proper voltage, the starter motor is likely in good condition. If not, consider consulting a professional for further assistance.
Troubleshooting And Solutions
Testing your lawn mower starter with a multimeter can save you time and money. Understanding the common problems and their solutions is crucial. This guide will help you diagnose the issues and offer repair and replacement options.
Diagnosing Common Problems
First, check the battery. A low battery charge can prevent the starter from working. Use your multimeter to test the battery voltage. Set the multimeter to DC volts. Attach the red probe to the positive terminal and the black probe to the negative terminal. A healthy battery should read around 12.6 volts.
If the battery is fine, examine the starter solenoid. The solenoid is a switch that sends power to the starter motor. Test the solenoid by connecting the multimeter probes to the solenoid terminals. The multimeter should read zero ohms. If it reads higher, the solenoid might be faulty.
Repair And Replacement Options
If the battery is dead, consider replacing it. You can find suitable batteries at local hardware stores or online. Always double-check the specifications to ensure compatibility with your lawn mower.
If the solenoid is the issue, you can repair or replace it. Solenoids are usually affordable and available at most hardware stores. Follow the manufacturer’s instructions for installation. If you’re not comfortable with this, seek professional help.
For a faulty starter motor, you might need a replacement. Test the motor by connecting the multimeter probes to the motor terminals. A reading of zero ohms indicates a working motor. If the reading is higher, the motor may need replacement.
| Component | Healthy Reading | Action |
|---|---|---|
| Battery | 12.6 volts | Replace if reading is low |
| Solenoid | Zero ohms | Replace if reading is high |
| Starter Motor | Zero ohms | Replace if reading is high |
Regular maintenance can prevent many of these issues. Always check connections and clean terminals. A little effort can keep your lawn mower running smoothly.
Frequently Asked Questions
How Do I Test A Lawn Mower Starter With A Multimeter?
To test, set your multimeter to DC volts. Connect the red probe to the starter’s positive terminal and the black probe to a ground. Turn the key; a reading between 12. 6 to 14 volts indicates a good starter.
What Multimeter Setting For Lawn Mower Starter Test?
Set your multimeter to measure DC volts. This setting helps you check the voltage reaching your lawn mower starter.
Why Won’t My Lawn Mower Starter Engage?
A faulty starter, dead battery, or bad connections can cause the starter not to engage. Test each component.
Can I Test A Lawn Mower Starter Myself?
Yes, you can. With a multimeter and basic knowledge, you can test your lawn mower starter easily.
Conclusion
Testing your lawn mower starter with a multimeter is straightforward. Follow the steps closely. Ensure safety by disconnecting the spark plug. Check the battery voltage first. Then, test the starter solenoid. Finally, inspect the starter motor. Regular maintenance can prevent issues.
Keep your lawn mower running smoothly. Use your multimeter confidently. Save time and money with these easy steps. Happy mowing!
