
Starting your Ryobi Lawn Mower 40V is simple. Follow these steps to get mowing quickly.
A well-manicured lawn can transform your yard. The Ryobi Lawn Mower 40V is a popular choice for many homeowners. It’s efficient, eco-friendly, and easy to use. But, if you’re new to this tool, you might need a bit of guidance.
This blog will walk you through the process. Starting your Ryobi Lawn Mower 40V doesn’t have to be a hassle. With a few straightforward steps, you’ll be ready to tackle your lawn in no time. Whether you’re a seasoned gardener or a beginner, this guide is here to help. Let’s dive in and get that mower running smoothly!
Unboxing And Assembly
Starting your journey with a Ryobi Lawn Mower 40V begins with the unboxing and assembly process. This step-by-step guide will walk you through the initial setup, ensuring that your lawn mower is ready for use. Let’s dive into the details!
Unpacking The Lawn Mower
First, carefully open the box using a utility knife. Make sure not to cut too deep to avoid damaging the contents inside. Here’s what you will find inside the box:
- The Ryobi 40V Lawn Mower
- Upper and lower handle parts
- A battery and charger
- Grass catcher bag
- User manual and warranty card
Lay out all the components on a flat surface to ensure you have everything you need.
Attaching The Handle And Parts
Now, it’s time to assemble your lawn mower. Follow these simple steps to attach the handle and other parts:
- Position the lower handle: Insert the lower handle into the slots provided on the mower deck. Secure it with the bolts and nuts provided.
- Attach the upper handle: Align the upper handle with the lower handle. Use the knobs and bolts to secure them together. Ensure the handles are tight and stable.
- Connect the grass catcher bag: Attach the grass catcher bag to the rear of the mower. Make sure it clicks into place.
- Insert the battery: Slide the 40V battery into the designated slot until it clicks. This ensures the mower has power.
Once everything is assembled, double-check all connections to make sure they are secure. This ensures your lawn mower is ready for its first use.
Preparing The Battery
Insert the battery into the Ryobi Lawn Mower 40V securely. Ensure it is fully charged for optimal performance.
Getting your Ryobi Lawn Mower 40V ready starts with the battery. Before you can mow, you need to charge and insert the battery. This ensures your mower runs smoothly and efficiently. Let’s walk through these steps.Charging The 40v Battery
First, locate the charger that came with your mower. Plug the charger into a wall outlet. Next, take the 40V battery and align it with the charger. Slide the battery into the charger until it clicks. You will see a light indicator on the charger. A red light means the battery is charging. A green light means the battery is fully charged. Charging can take a few hours, so plan ahead.Inserting The Battery Into The Mower
After the battery is fully charged, remove it from the charger. Now, open the battery compartment on your mower. You will find it on the top or side of the mower. Align the battery with the compartment. Slide the battery into place until it clicks. Make sure the battery is secure before closing the compartment. This will ensure the mower has power and is ready to use. “`Adjusting The Mower Settings
Adjusting the settings on your Ryobi Lawn Mower 40V is crucial. This ensures you get the best performance from your mower. It also helps in achieving the desired look for your lawn. Let’s explore how to set the cutting height and adjust the handle position.
Setting The Cutting Height
First, turn off the mower and remove the battery. Look for the height adjustment lever on the side of the mower. Move the lever to select your desired cutting height. The Ryobi Lawn Mower 40V offers multiple height settings. Choose the one that suits your lawn best. Make sure the lever clicks into place. This ensures the mower stays at the chosen height while in use.
Adjusting The Handle Position
Next, focus on the handle position. Comfortable handle position is key to ease of use. Look for the handle adjustment knobs on either side of the mower. Loosen these knobs to adjust the handle. Raise or lower the handle to a comfortable height. Tighten the knobs again to secure the handle in place. A well-adjusted handle reduces strain and makes mowing more enjoyable.

Starting The Mower
Starting your Ryobi Lawn Mower 40V is a simple process. This guide will help you get your mower running quickly. Follow these steps to ensure your mower starts correctly.
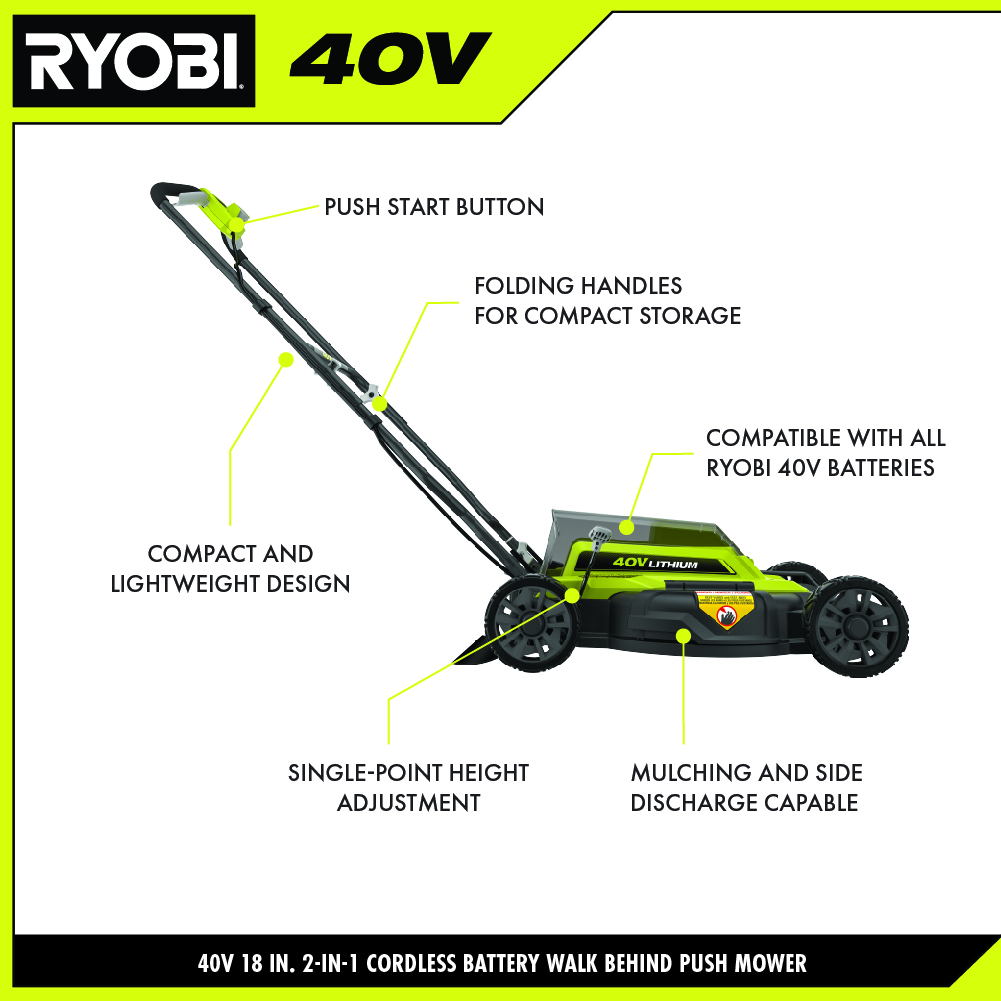
Engaging The Safety Key
First, locate the safety key on your mower. The safety key is usually near the handle. Insert the key into the slot. This step is crucial as the mower will not start without it. Make sure the key is fully inserted.
Pressing The Start Button
Next, find the start button on your mower. The start button is often near the handle, close to the safety key. Press and hold the start button. While holding the button, pull the lever towards you. This action engages the motor. Release the start button once the motor starts. Now, your mower is ready to use.
Mowing Techniques
Mastering the right mowing techniques is key to a beautiful lawn. Using your Ryobi Lawn Mower 40V correctly ensures efficient mowing and a healthy yard. Below, we explore effective methods for different terrains and offer practical mowing tips.
Using The Mower On Different Terrains
The Ryobi Lawn Mower 40V handles various terrains with ease. Each type of terrain requires specific techniques for best results:
- Flat Lawns: Use a consistent pace. Overlap each pass slightly to avoid missed spots.
- Hilly Areas: Mow across slopes for safety. Avoid mowing up and down to prevent tipping.
- Uneven Ground: Adjust the cutting height to avoid scalping. Go slow to navigate bumps and dips.
- Wet Grass: Mow when the grass is dry if possible. Wet grass can clog the mower and cause uneven cutting.
Tips For Efficient Mowing
Efficient mowing saves time and energy. Here are some tips to make your mowing sessions more effective:
- Sharpen the Blades: Sharp blades cut cleaner and reduce strain on the mower.
- Empty the Bag Regularly: A full bag can slow down the mower. Empty it to maintain optimal performance.
- Set the Right Height: Adjust the cutting height based on the grass type and season. Taller grass shades the soil, which helps retain moisture.
- Mow in Different Directions: Change the mowing pattern each time. This prevents grass from leaning and promotes even growth.
By following these mowing techniques, you will achieve a well-maintained lawn. The Ryobi Lawn Mower 40V is designed to make this process smooth and efficient. Happy mowing!
Maintenance And Storage
Proper maintenance and storage of your Ryobi Lawn Mower 40V can extend its lifespan and ensure optimal performance. Regular cleaning and correct storage are essential. Below are some easy steps to keep your mower in top shape.
Cleaning The Mower After Use
After mowing, it’s important to clean your mower. Follow these steps:
- Turn off the mower and remove the battery.
- Use a brush to remove grass clippings and debris.
- Wipe the mower with a damp cloth. Avoid using water directly.
- Check and clean the blades. Ensure they are sharp for the next use.
Storing The Mower And Battery
Storing your mower and battery correctly is crucial. Here’s how:
- Store the mower in a dry and cool place.
- Remove the battery before storage.
- Keep the battery in a cool, dry location. Avoid direct sunlight.
- Charge the battery to around 50% if storing for a long period.
Avoid storing the mower outside. This can cause rust and damage.
| Storage Location | Condition |
|---|---|
| Garage | Dry and cool |
| Shed | Dry and cool |
| Indoor | Dry and cool |
Proper maintenance and storage ensure your Ryobi Lawn Mower 40V is always ready for use. Follow these simple steps to keep your mower in top condition.
Troubleshooting Common Issues
Even the best tools can run into issues. Starting your Ryobi Lawn Mower 40V might sometimes be a challenge. Let’s look at some common problems you might face. This guide will help you troubleshoot and solve these issues.
Mower Won’t Start
If your mower won’t start, check a few key areas first:
- Battery: Ensure the battery is fully charged. A low battery might prevent the mower from starting.
- Connection: Make sure the battery is properly connected. Remove and reinsert it to ensure a good connection.
- Safety Key: Check if the safety key is inserted correctly. Without it, the mower won’t start.
- Switch: Verify that the start switch is working. Press it firmly and listen for any response.
Addressing these points can often resolve the issue. If the problem persists, refer to your user manual for further instructions.
Battery Charging Problems
Battery issues are common with electric mowers. Here are some steps to troubleshoot:
- Charger: Check if the charger is working. Plug it into a different outlet to test.
- Connections: Ensure all connections are secure. Loose connections might cause charging problems.
- Temperature: Batteries charge best at room temperature. Avoid extreme cold or heat.
- Indicator Light: Look for the indicator light on the charger. It should show that the battery is charging.
Follow these steps to resolve charging issues. If the battery still does not charge, it might need replacement.
Frequently Asked Questions
How Do You Start A Ryobi 40v Lawn Mower?
To start a Ryobi 40V lawn mower, insert the battery, press the start button, and pull the lever. Ensure the battery is fully charged.
Why Won’t My Ryobi 40v Mower Start?
Check if the battery is fully charged and properly connected. Ensure the safety key is inserted correctly.
How Long Does Ryobi 40v Battery Last?
The Ryobi 40V battery typically lasts around 40 minutes, depending on the grass conditions and mower usage.
How Do You Maintain A Ryobi 40v Lawn Mower?
Regularly clean the deck, sharpen the blades, and check the battery. Store it in a dry place.
Conclusion
Starting your Ryobi 40V lawn mower is straightforward. Follow the steps carefully. Ensure the battery is charged. Insert it into the slot securely. Push the safety button, then pull the handle lever. Your mower should start smoothly. Always read the manual for detailed guidance.
Regular maintenance keeps your mower in good shape. With these tips, mowing your lawn becomes easy and efficient. Happy mowing!
