
Cleaning a carburetor on a lawn mower is essential for its performance. It ensures the engine runs smoothly and efficiently.
A dirty carburetor can cause many issues. Your lawn mower might sputter or stall. Regular maintenance can prevent these problems. Cleaning the carburetor might sound complex, but it is manageable with the right guidance. In this blog post, you will learn the simple steps to clean your lawn mower’s carburetor effectively.
We will cover the tools you need and the process to follow. By the end, you will have a well-functioning mower ready to tackle your lawn. Let’s dive into the details and ensure your lawn mower runs like new.
Preparation
Before you start cleaning your lawn mower’s carburetor, proper preparation is key. This step ensures safety and efficiency. Let’s dive into the main aspects of preparation.
Gather Necessary Tools
First, gather all the tools you need. Having everything ready saves time and effort.
- Screwdrivers (flathead and Phillips)
- Wrenches (various sizes)
- Carburetor cleaner
- Cleaning brush
- Gloves
- Safety glasses
- A clean cloth
Keep these tools within reach. This makes the cleaning process smoother.
Ensure Safety Precautions
Safety should be your top priority. Follow these steps to stay safe:
- Disconnect the Spark Plug: This prevents accidental starts.
- Work in a Well-Ventilated Area: Carburetor cleaner fumes can be harmful.
- Wear Protective Gear: Use gloves and safety glasses to protect yourself.
- Keep Fire Extinguisher Nearby: In case of any fire hazards.
Following these precautions reduces risks and ensures a safer work environment.
Removing The Carburetor
Removing the carburetor from your lawn mower can seem daunting. By following these easy steps, you will have it off in no time. This guide will help you disconnect the fuel line and detach the carburetor from the engine.
Disconnect Fuel Line
First, locate the fuel line connected to the carburetor. Use pliers to release the clamps holding the fuel line in place. Carefully pull the fuel line away from the carburetor. Be prepared for any fuel that may spill out. Use a container to catch any fuel.
Once the fuel line is disconnected, plug the line to prevent fuel from leaking. This step is crucial for safety. You can use a bolt or a cap to plug it. Ensure the fuel line is secured and not leaking.
Detach Carburetor From Engine
Next, find the bolts or screws holding the carburetor to the engine. Use a wrench or screwdriver to remove them. Carefully take out each bolt and set them aside. Keep them in a safe place, as you will need them later.
Gently pull the carburetor away from the engine. Be cautious of the gaskets and linkages. Note their positions for reassembly. If any gaskets are damaged, replace them. Check the linkages for wear and tear.
With the carburetor detached, you can now proceed to clean it. Follow the next steps in our guide to ensure a thorough cleaning. A clean carburetor will improve your lawn mower’s performance.
Disassembling The Carburetor
Disassembling the carburetor is crucial for a thorough clean. It helps in removing all the dirt and debris. Follow these steps to safely disassemble your lawn mower’s carburetor.
Remove Carburetor Bowl
First, locate the carburetor bowl at the bottom of the carburetor. Use a wrench to remove the bolt holding the bowl. Be careful, as gas might spill out. Place the bolt and bowl aside in a safe place. Inspect the bowl for any dirt or residue. Clean it with a carburetor cleaner if necessary.
Take Apart Components
Next, carefully take apart the internal components. Remove the float by taking out the pin that holds it in place. Set the float aside. Then, remove the needle valve and any other small parts. Keep track of these parts to ensure easy reassembly. Clean each component thoroughly. Use a carburetor cleaner to remove any built-up grime or deposits.
Cleaning The Carburetor
Maintaining your lawn mower involves cleaning the carburetor regularly. The carburetor controls the fuel and air mix that powers the engine. If it gets clogged, the mower might not start or run well. Let’s break down the steps to clean it.
Clean Carburetor Bowl
First, locate the carburetor bowl. It sits at the bottom of the carburetor. Use a wrench to remove the bolt holding it. Be careful; some fuel may spill out. Clean the bowl with a rag or brush. Remove any dirt or debris. Check for any signs of wear or damage. If the bowl is too dirty or damaged, replace it. Reattach the bowl securely.
Scrub Jets And Passages
Next, focus on the jets and passages. These small parts can get easily clogged. Use a carburetor cleaner spray to loosen the dirt. A small brush or wire can help scrub these parts. Gently scrub to avoid damage. Make sure all passages are clear. This ensures a smooth fuel and air mix. Reassemble all parts carefully. Double-check that everything is tight and secure.
Reassembling The Carburetor
Reassembling the carburetor is a crucial step in ensuring your lawn mower runs smoothly. After cleaning, putting the parts back together correctly will help avoid any issues.
Follow these steps to reassemble the carburetor accurately.
Reattach Components
Start by reattaching the main components. This includes the float bowl, float, needle, and gaskets. Be careful not to damage any delicate parts.
- Place the float and needle back in their positions.
- Secure the float bowl using its screws.
- Install new gaskets to ensure a tight seal.
Each step is important for proper functioning.
Ensure Proper Alignment
Proper alignment of the carburetor ensures your lawn mower runs efficiently. Misalignment can cause performance issues.
- Check that the throttle linkage moves smoothly.
- Align the choke plate correctly.
- Ensure all connections are tight and secure.
Double-check your work to avoid any mistakes.
By following these steps, your lawn mower’s carburetor will be reassembled correctly, ensuring optimal performance.

Reinstalling The Carburetor
After cleaning, the next step is to reinstall the carburetor. This part is crucial for your lawn mower to run smoothly. Follow these steps to make sure everything is in place correctly.
Reconnect Fuel Line
First, locate the fuel line. It’s the tube that carries gas to the carburetor. You need to attach this back to the carburetor’s fuel inlet.
- Slide the fuel line clamp back onto the line.
- Push the fuel line onto the carburetor’s inlet.
- Secure it with the clamp.
Make sure there are no leaks. A secure connection is vital for proper fuel flow.
Secure Carburetor To Engine
Next, you need to attach the carburetor to the engine. This involves several steps:
- Align the carburetor with the mounting studs.
- Slide the carburetor onto the studs.
- Use the nuts to secure it in place.
Tighten the nuts evenly. This ensures the carburetor is firm and stable.
Double-check all connections and bolts. Everything must be tight and secure. This prevents any operational issues and ensures the lawn mower runs efficiently.
Testing And Maintenance
Maintaining your lawn mower’s carburetor ensures it runs smoothly. Regular testing and maintenance can prevent costly repairs. This section will guide you on how to test your lawn mower and provide essential maintenance tips.
Test The Lawn Mower
After cleaning the carburetor, it’s crucial to test the lawn mower. Follow these steps:
- Check the Fuel: Ensure the fuel tank is full. Use fresh gasoline.
- Inspect the Spark Plug: Remove the spark plug. Clean or replace it if needed.
- Prime the Carburetor: Use the primer bulb to push fuel into the carburetor.
- Start the Engine: Pull the starter rope. Listen for any unusual sounds.
- Check Performance: Observe the mower’s operation. It should run smoothly without stalling.
Regular Maintenance Tips
Consistent maintenance can extend the life of your lawn mower. Follow these tips:
- Clean the Air Filter: A dirty air filter can clog the carburetor. Clean or replace it regularly.
- Change the Oil: Fresh oil keeps the engine lubricated. Change it every 25-50 hours of use.
- Inspect the Blades: Sharp blades cut grass efficiently. Sharpen or replace them as needed.
- Examine the Fuel Line: Check for cracks or leaks. Replace damaged fuel lines immediately.
- Store Properly: Keep your mower in a dry place. This prevents rust and corrosion.
| Maintenance Task | Frequency |
|---|---|
| Clean Air Filter | Every 25 hours |
| Change Oil | Every 25-50 hours |
| Sharpen Blades | Every season |
| Inspect Fuel Line | Every season |
Following these steps ensures your lawn mower stays in top condition. Testing and regular maintenance are key to its longevity.

Frequently Asked Questions
How Do I Know If My Lawn Mower Carburetor Needs Cleaning?
If your lawn mower has trouble starting, stalls, or runs roughly, the carburetor may need cleaning. Look for black smoke or increased fuel consumption as well.
What Tools Are Needed To Clean A Lawn Mower Carburetor?
To clean a carburetor, you’ll need screwdrivers, a carburetor cleaner, a wrench set, and safety gloves. These tools help in disassembling and cleaning effectively.
How Often Should I Clean My Lawn Mower Carburetor?
Clean the carburetor at least once a season, or every 25-30 hours of use. Regular cleaning ensures optimal performance and prolongs the engine’s life.
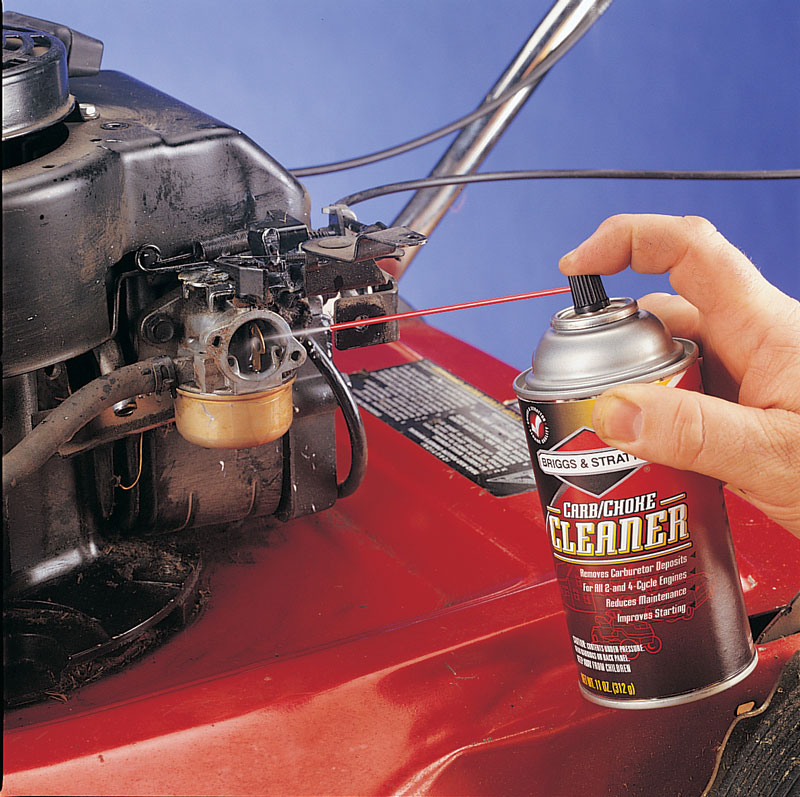
Can I Clean A Lawn Mower Carburetor Without Removing It?
Yes, you can clean the carburetor without removing it. Use a carburetor cleaner spray and target the jets and throttle body to remove debris.
Conclusion
Cleaning your lawn mower’s carburetor is easier than you think. Follow the steps carefully. Ensure all parts are clean and dry before reassembling. This process helps your mower run smoothly. Regular maintenance extends its life. No need for professional help.
Save money and keep your lawn looking great. Remember, a clean carburetor means better performance. So, make this a part of your routine. Happy mowing!
