Checking a lawn mower coil is crucial for its performance. A faulty coil can cause your mower to malfunction.
In this guide, you will learn how to check a lawn mower coil. Understanding your lawn mower’s coil can save you time and money. A coil transfers energy to the spark plug, igniting the fuel. If the coil fails, the mower won’t start.
This task might seem tricky, but it’s simpler than you think. With the right steps, you can diagnose coil issues without professional help. Let’s explore the process of checking a lawn mower coil, ensuring your mower runs smoothly and efficiently. Ready to get your hands dirty? Let’s dive in!
Identifying The Coil
Before you can check a lawn mower coil, you need to identify it. The coil is a key part of the ignition system. It helps start the engine. Recognizing it is crucial for a smooth check.
Location Of The Coil
The coil is usually near the flywheel. The flywheel is on top of the engine. Sometimes, it’s under the engine cover. Look for a small, rectangular part. It has wires connected to it. That’s your coil.
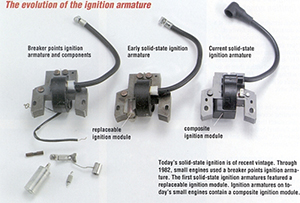
Types Of Lawn Mower Coils
Lawn mower coils come in two main types. First, the magneto coil. It’s common in older models. Second, the electronic ignition coil. Modern mowers often use this type. Both types serve the same purpose. They generate the spark for the engine.
Preparing For Inspection
Before checking your lawn mower coil, it’s important to prepare properly. This ensures your safety and makes the process smoother. Let’s go through the steps in detail.
Safety Precautions
First and foremost, you need to follow some safety precautions:
- Wear protective gloves to avoid any cuts or injuries.
- Use safety goggles to protect your eyes from debris.
- Ensure the mower is off and the spark plug is disconnected.
- Work in a well-ventilated area to avoid inhaling any fumes.
Removing The Spark Plug
To inspect the coil, you need to remove the spark plug first:
- Locate the spark plug on your lawn mower.
- Use a spark plug wrench to unscrew it.
- Carefully pull the spark plug out.
- Place the spark plug in a safe spot.
Removing the spark plug ensures that the mower won’t start accidentally. This is a crucial step in the inspection process.
Visual Inspection
A visual inspection is the first step to check a lawn mower coil. It helps identify any visible issues. Before starting, ensure the mower is off. Safety first. This step is crucial for effective maintenance.
Signs Of Damage
Look closely at the coil. Check for cracks or breaks. Damaged coils can cause mower issues. Inspect the wiring. Any frayed or broken wires need attention. Rust is a bad sign. It can affect coil performance. Pay attention to these signs.
Cleaning The Coil Area
A clean coil works better. Remove any dirt or debris. Use a soft brush. Gently clean around the coil. Avoid water. It can damage the coil. Ensure the area is dry. A clean coil improves mower efficiency.
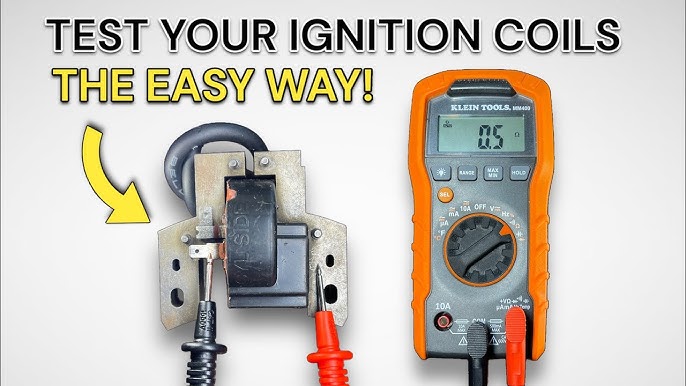
Testing With A Multimeter
Testing a lawn mower coil with a multimeter helps ensure your mower starts and runs smoothly. This guide will walk you through the process step-by-step. It is simple and can save you from costly repairs.
Setting Up The Multimeter
First, gather your tools. You will need a multimeter and the lawn mower. Ensure the mower is off and the spark plug wire is disconnected. Safety first!
Set your multimeter to the ohms (Ω) setting. This measures resistance. A good coil should have specific resistance values.
Connect the multimeter probes to the coil terminals. The black probe goes to the negative terminal, and the red probe goes to the positive terminal. Check your mower’s manual if unsure which terminals to use.
Interpreting The Readings
Now, look at the multimeter display. You should see a number indicating the coil’s resistance.
Compare this number to the recommended resistance value in your mower’s manual. If the reading is within this range, your coil is likely in good shape. If the reading is too high or too low, the coil might be faulty.
Here’s a quick reference table to help:
| Reading | Coil Condition |
|---|---|
| Within range | Good |
| Too high/low | Faulty |
Remember, a faulty coil can cause starting issues or poor performance. Testing with a multimeter is a quick and effective way to diagnose problems.
Checking For Spark
Checking for spark is a crucial step in diagnosing lawn mower coil issues. A spark indicates the coil is working correctly, sending the necessary electric current to ignite the fuel. Without it, your lawn mower won’t start, leaving your grass uncut.
Using A Spark Tester
First, get a spark tester. This tool is affordable and easy to use. Disconnect the spark plug wire from the spark plug. Attach the spark tester to the end of the spark plug wire. Connect the other end of the tester to the spark plug.
Crank the engine by pulling the starter cord. Observe the tester. A bright spark should appear in the tester window. This confirms the coil is producing the necessary voltage.
Observing The Spark
If the spark is weak or absent, your coil might be faulty. A strong, visible spark is necessary for engine ignition. A weak spark may indicate a coil problem or other electrical issues.
Repeat the test a few times to confirm the results. Consistent spark means the coil is functioning. Inconsistent or no spark suggests a replacement or further inspection.
Troubleshooting Common Issues
Having trouble with your lawn mower coil can be frustrating. Understanding how to troubleshoot common issues can save you time and money. In this section, we will discuss common problems like weak spark and no spark. Let’s dive in.
Weak Spark Problems
A weak spark in your lawn mower can cause poor performance. Here are some steps to diagnose and fix weak spark problems:
- Inspect the spark plug. A dirty or damaged spark plug can cause weak sparks.
- Check the gap between the electrodes. Use a feeler gauge to ensure proper gap.
- Examine the ignition coil. Look for signs of wear or damage.
- Test the coil with a multimeter. A weak reading indicates a problem.
Regular maintenance of these components can prevent weak spark issues. Always keep spare spark plugs on hand.
No Spark Issues
No spark issues can stop your lawn mower from starting. Follow these steps to troubleshoot:
- Remove the spark plug and inspect it.
- Use a spark tester to check for spark. Connect the tester to the spark plug wire.
- Crank the engine. If there is no spark, the coil may be faulty.
- Check the coil connections. Ensure all wires are properly connected.
- Test the coil with a multimeter. No reading means the coil is dead.
Replace the ignition coil if necessary. This should restore spark and get your mower running again.
By following these simple steps, you can troubleshoot and fix common lawn mower coil issues. Regular checks and maintenance help keep your lawn mower in top shape.
Maintaining The Coil
Maintaining the coil of your lawn mower is crucial for its performance. A well-maintained coil ensures efficient ignition and smooth operation. Proper care can extend the life of your mower. Let’s explore some essential tips and guidelines.
Regular Maintenance Tips
Regular maintenance helps keep the coil in good condition. Follow these simple steps:
- Clean the coil regularly to remove dirt and debris.
- Inspect for wear and tear. Look for cracks or damage.
- Check connections. Ensure all wires are secure and free from corrosion.
- Test the coil using a multimeter to ensure it’s working correctly.
Perform these checks monthly to keep your lawn mower running smoothly.
When To Replace The Coil
Sometimes, maintenance isn’t enough. Knowing when to replace the coil is important. Here are some indicators:
- The mower won’t start or has difficulty starting.
- The engine misfires or runs erratically.
- Visible damage to the coil such as cracks or burns.
- The coil fails a continuity test with a multimeter.
Replace the coil immediately if you notice these signs. It ensures your mower operates efficiently.
| Maintenance Task | Frequency |
|---|---|
| Clean the coil | Monthly |
| Inspect for damage | Monthly |
| Check connections | Monthly |
| Test with multimeter | Monthly |
By following these maintenance tips, you can keep your lawn mower in top shape. Regular checks and timely replacements can save you from costly repairs.


Frequently Asked Questions
How Do You Test A Lawn Mower Coil?
To test a lawn mower coil, use a multimeter. Set it to the ohms setting. Measure resistance between the coil’s terminals. Compare the readings with the manufacturer’s specifications.
What Are The Symptoms Of A Bad Lawn Mower Coil?
Symptoms include difficulty starting, poor performance, and frequent stalling. If the engine runs inconsistently or dies suddenly, check the coil.
Can A Lawn Mower Coil Be Repaired?
Lawn mower coils are typically not repairable. If faulty, replacement is the best option. Always use a compatible part.
How Often Should You Check The Lawn Mower Coil?
Check the coil annually or when experiencing performance issues. Regular maintenance ensures reliable operation and prolongs the mower’s lifespan.
Conclusion
Checking a lawn mower coil is a simple task. It ensures your mower runs smoothly. Regular maintenance can prevent bigger problems. Always follow safety guidelines when working on your mower. Gather your tools and take your time. A properly functioning coil extends the mower’s life.
Keep your lawn looking great with a well-maintained mower. Happy mowing!
