Installing a lawn mower battery is easy with the right guide. It only takes a few simple steps.
A lawn mower’s battery powers the engine and keeps it running smoothly. Over time, the battery may need replacement. Knowing how to install a new battery can save you time and money. In this guide, we will show you the steps to install a lawn mower battery safely and efficiently.
Whether you’re a seasoned gardener or a newbie, this guide will help you get your mower back in action quickly. Let’s dive into the process and ensure your lawn stays neatly trimmed.

Choosing The Right Battery
Choosing the right battery is crucial for the performance of your lawn mower. Not all batteries are created equal. The right battery ensures your mower runs smoothly and efficiently. Let’s dive into the key factors to consider.
Battery Types
There are different types of batteries available. Lead-acid and lithium-ion are the most common. Lead-acid batteries are traditional and cost-effective. They are also heavier and need regular maintenance. Lithium-ion batteries are newer and lighter. They offer longer life and require less upkeep.
Compatibility
Check if the battery fits your lawn mower model. Compatibility is key. Using the wrong battery can damage your mower. Read your mower’s manual to find the right specifications. Consider the voltage and dimensions. The battery must match your mower’s requirements for optimal performance.

Gathering Necessary Tools
Before diving into the installation process, it’s crucial to gather all necessary tools. Having everything at hand ensures a smooth and hassle-free experience. This preparation step saves time and avoids interruptions.
Required Tools
To install a lawn mower battery, gather these essential tools:
- Screwdriver – both flathead and Phillips
- Wrench set
- Battery terminal cleaner
- Wire brush
- Battery hold-down strap or bracket
Ensure these tools are in good condition. This prevents any potential issues during the installation process.
Safety Gear
Prioritize safety by wearing the right gear. Safety gear protects you from potential hazards while working with the battery.
- Protective gloves
- Safety glasses
- Long sleeves
These items shield your skin and eyes from harmful chemicals. They also help prevent injuries from sharp tools.
Preparing The Lawn Mower
Before installing a new battery in your lawn mower, it’s crucial to prepare the mower properly. This ensures safety and makes the installation process smoother. Follow these steps to get your lawn mower ready for a new battery.
Parking Safely
First, park the lawn mower on a flat, stable surface. Ensure the area is free from any obstacles. Engage the parking brake to prevent any movement. This step is essential for your safety and stability during the battery installation.
Disconnecting The Old Battery
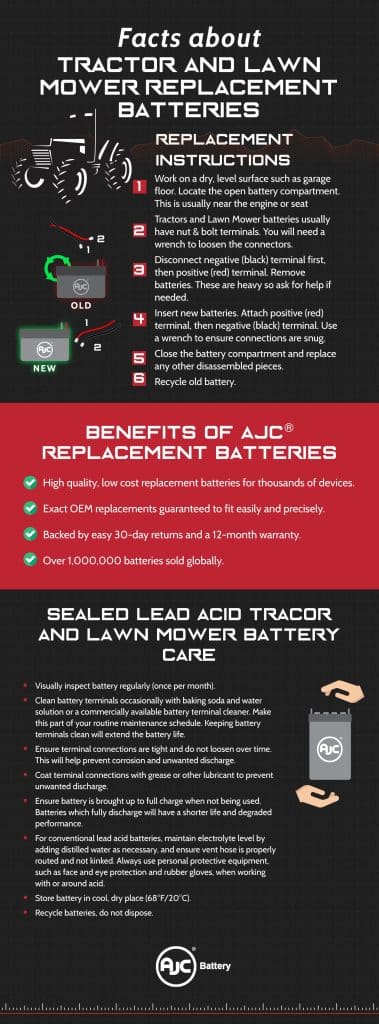
Once parked safely, locate the battery compartment. It is usually under the seat or hood. Use a wrench to disconnect the negative terminal first. This prevents any electrical discharge or shock. Next, disconnect the positive terminal. Carefully remove the old battery and set it aside. Make sure to dispose of the old battery properly, following local regulations.
At this point, your lawn mower is ready for the new battery installation. Proceed with caution and follow the manufacturer’s instructions closely.
Removing The Old Battery
To install a new lawn mower battery, you need to remove the old one first. This process is simple but requires caution. Follow these steps to ensure safety and efficiency.
Locating The Battery
First, locate the battery on your lawn mower. It is typically under the seat or hood. Check your mower’s manual if unsure. Look for a rectangular box with cables attached.
Taking Out The Battery
Once found, disconnect the negative cable first. This cable is usually black and marked with a minus sign. Use a wrench to loosen the bolt and remove the cable. Next, disconnect the positive cable. It is red and marked with a plus sign. Again, use a wrench to loosen and remove it.
Now, lift the battery out of its compartment. Batteries can be heavy, so lift carefully. Dispose of the old battery properly. Many auto parts stores accept used batteries for recycling.
Installing The New Battery
Installing a new battery in your lawn mower is a simple process. Follow these steps to ensure the battery is installed correctly. This guide will help you position the battery and connect the terminals.
Positioning The Battery
Start by opening the battery compartment. This is usually located under the seat or hood of the mower. Remove any old battery if present. Carefully place the new battery into the compartment. Ensure the battery sits firmly in place. The battery should not move or shift.
Connecting Terminals
First, connect the positive terminal. The positive terminal is usually marked with a plus sign (+) and is red. Attach the positive cable to the positive terminal. Tighten the connector to ensure a secure fit. Next, connect the negative terminal. The negative terminal is marked with a minus sign (-) and is black. Attach the negative cable to the negative terminal. Tighten the connector to ensure a secure fit.
Double-check that both terminals are connected properly. The connections should be tight and secure. This ensures the battery will work correctly.
Securing The Battery
Once you have placed the new battery in your lawn mower, the next step is to secure it properly. This ensures safety and optimal performance. Follow these simple steps to make sure your battery is fastened correctly and all connections are secure.
Fastening The Battery
Begin by positioning the battery snugly in its compartment. Use the provided straps or brackets to hold it in place. Ensure the battery does not move when the mower is in use.
Step-by-step process:
- Place the battery in the designated compartment.
- Use the battery holder to secure it.
- Tighten any screws or clips to keep the battery fixed.
Proper fastening prevents the battery from shifting during operation. This minimizes the risk of damage or disconnection.
Checking Connections
After fastening the battery, check all the connections. Ensure both the positive and negative terminals are properly attached.
Important: Always connect the positive terminal first and the negative terminal last.
| Connection | Action |
|---|---|
| Positive Terminal | Connect first and secure tightly. |
| Negative Terminal | Connect last and check for tightness. |
Make sure there are no loose wires. Tight connections ensure efficient power flow and prevent potential hazards.
Tip: Use a wrench to tighten the terminal nuts for a secure fit.
Testing The Installation
Testing the installation of your lawn mower battery is a crucial step. It ensures that everything works smoothly. A proper test confirms the battery is installed correctly. Let’s dive into the steps you need to follow.
Starting The Mower
First, make sure the mower is on a flat surface. Engage the parking brake for safety. Insert the key into the ignition. Turn the key to the start position. Listen for the engine to crank. If it starts, the battery is working.
Troubleshooting Issues
If the mower does not start, don’t panic. Check the battery connections. They should be tight and free of corrosion. Inspect the battery terminals. Clean them with a wire brush if needed. Try starting the mower again. If it still does not start, the battery might be faulty. Test the battery voltage with a multimeter. It should read around 12.6 volts. A lower reading means the battery may need charging or replacement.
Maintaining The Battery
Ensuring your lawn mower battery remains in good condition is essential. Proper maintenance can extend its lifespan and improve performance. Let’s delve into the key aspects of maintaining your lawn mower battery.
Regular Checks
Regularly inspect your lawn mower battery to keep it in peak condition.
- Check the Voltage: Use a multimeter to test the voltage. A fully charged battery should read around 12.6 volts.
- Inspect for Corrosion: Look for any signs of corrosion on the battery terminals. Clean them using a mixture of baking soda and water.
- Check Connections: Ensure all connections are tight and secure. Loose connections can cause power issues.
Proper Storage
Storing your lawn mower battery correctly during off-season is crucial.
- Remove the Battery: Take out the battery from the mower if you won’t use it for a while.
- Store in a Cool, Dry Place: Keep the battery in a place that is cool and dry. Avoid extreme temperatures.
- Charge Before Storing: Fully charge the battery before storage. This helps maintain its health.
Following these steps will help keep your lawn mower battery in top shape. Regular checks and proper storage are key to a longer battery life.

Frequently Asked Questions
How To Hook Up A Battery On A Lawn Mower?
First, turn off the mower. Locate the battery compartment. Connect the positive (red) cable to the positive terminal. Attach the negative (black) cable to the negative terminal. Securely tighten all connections.
Which Side Of Mower Battery Is Positive?
The positive side of a mower battery is marked with a “+” symbol. It’s usually red in color.
Does It Matter What Battery I Put In My Lawn Mower?
Yes, it matters. Use the correct battery type and voltage for your lawn mower to ensure safety and performance.
How To Start A Lawn Mower With A Dead Battery?
Jump-start the mower using a car battery. Connect the positive and negative terminals. Let it charge for a few minutes. Start the mower.
Conclusion
Installing a lawn mower battery is easier than it seems. Just follow the steps mentioned, and you will be done in no time. Ensure connections are tight and secure. Always wear safety gear. Check the battery regularly to extend its life.
Now, you can enjoy a well-maintained lawn without any hassles. Happy mowing!
