Learning to draw can be fun and relaxing. Drawing a lawn mower may seem hard, but it is easier than you think.
This guide will show you simple steps to draw a lawn mower. No need to worry about being an artist. Anyone can follow these steps. You will need basic supplies like paper and a pencil. By the end, you will have a cool drawing to show off.
So, get ready to learn and have some fun. Let’s start drawing a lawn mower!

Setting Up Your Workspace
Setting up your workspace is crucial for a successful drawing session. A clean and organized area helps you focus better. You will need enough space to spread out your materials. A well-prepared workspace can make the drawing process more enjoyable.
Choosing The Right Environment
Select a quiet and comfortable place for drawing. Natural light is best for seeing colors accurately. If natural light isn’t available, use a bright lamp. Make sure your chair and table are at a comfortable height. Avoid places with distractions to maintain your concentration.
Organizing Your Tools
Gather all the tools you need before starting. You will need pencils, erasers, and paper. Keep them within easy reach. Sharpen your pencils and have extra paper ready. Arrange your tools neatly to avoid clutter. A tidy workspace helps you draw more efficiently.
Basic Shapes And Lines
Learning how to draw a lawn mower starts with understanding basic shapes and lines. This step is crucial for simplifying the drawing process. By breaking down the lawn mower into manageable parts, you can create a detailed and accurate illustration. Let’s dive into the essential steps.
Drawing Simple Shapes
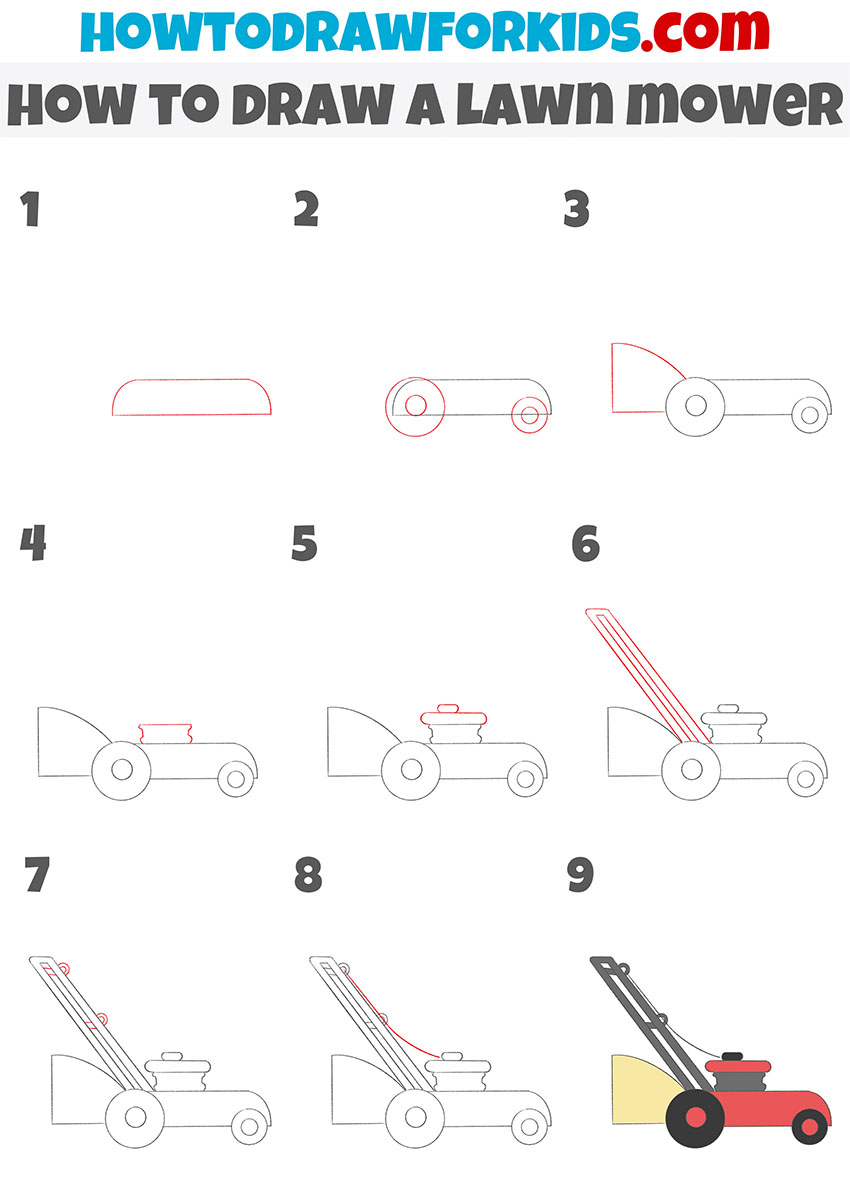
Begin with the main body of the lawn mower. Draw a large rectangle. This shape represents the mower’s deck. Next, draw a smaller rectangle attached to the top. This will be the handle area.
Add two circles at the bottom corners of the large rectangle. These circles will be the wheels. Make sure they are the same size. You now have the basic outline of the lawn mower.
Connecting The Shapes
Connect the smaller rectangle to the larger one with two straight lines. These lines form the handle bars. They should extend from the top corners of the large rectangle to the top of the smaller one.
Now, add a horizontal line inside the large rectangle. This line divides the deck into two sections. Draw a small rectangle inside one of the wheels. This represents the motor housing.
Finally, add a few curved lines around the handle area. These lines will give it a more realistic look. You have now connected all the shapes to form a basic lawn mower drawing.
Creating The Body
Creating the body of a lawn mower can be fun and simple. This step involves outlining the main structure and adding depth and dimension. Let’s dive into the details to make your lawn mower drawing look realistic and detailed.
Outlining The Main Structure
Start with a large rectangle to form the main body. This will be the base of the lawn mower. Ensure the lines are straight and even. Next, add a smaller rectangle on top, near the front. This will represent the engine cover. Draw another small rectangle at the back for the handle support.
Connect the handle support to the main body with two parallel lines. These lines will form the handle. Make sure they are slightly angled for a realistic look. Your lawn mower’s basic outline is now complete.
Adding Depth And Dimension
To add depth, draw another set of parallel lines inside the main body. This creates the illusion of a 3D shape. Sketch the wheels by drawing two circles on each side of the lawn mower. The front wheels should be slightly smaller than the back wheels.
Add a few more details to the engine cover. Draw small lines and shapes to represent the air filter and other engine parts. Finally, add some texture to the handle by drawing small lines or dots. This makes it look like a real grip.
Your lawn mower now has depth and dimension. It looks more realistic and detailed, ready for any lawn care duty.
Drawing The Wheels
Drawing the wheels of a lawn mower is a fun part. Wheels are essential for giving your lawn mower a realistic look. Follow these steps to sketch and detail your lawn mower wheels like a pro.
Sketching The Wheel Base
Start by drawing two circles for the wheels. Make sure the circles are the same size. These circles will be the base for your wheels. Place them evenly at the bottom corners of your lawn mower body.
Next, draw a smaller circle inside each wheel. This inner circle represents the hub of the wheel. The hub is where the axle will connect. Make sure the inner circle is centered.
Connect the wheels with two straight lines. These lines represent the axle. The axle will make your wheels look connected and functional.
Detailing The Treads
Now, add details to your wheels by drawing the treads. Start by drawing small, evenly spaced rectangles along the outer edge of each wheel. These rectangles are the treads. They give the wheel grip and texture.
Ensure the treads wrap around the entire wheel. Treads should look like they can grip the ground. Repeat the same pattern on both wheels.
Finally, add small lines in the inner circle to show the hubcap design. These lines can be straight or curved, depending on your design.
With these steps, your lawn mower wheels will look detailed and realistic. Drawing the wheels is simple and adds a lot of character to your lawn mower sketch.
Adding The Handle
Adding the handle is an essential step in drawing a lawn mower. The handle gives the mower its recognizable shape. It also highlights the machine’s functionality. In this section, we will focus on shaping and positioning the handle bars.
Shaping The Handle Bars
The handle bars are a key feature of the lawn mower’s design. Start by drawing two parallel lines extending upwards from the back of the mower’s body. These lines should be slightly curved to mimic the ergonomic design of real lawn mowers. This curvature gives a more realistic look.
To make the handle bars more detailed, draw a horizontal line connecting the two vertical lines at the top. This line forms the crossbar, which provides stability. Add small circles at the junctions to represent bolts or screws. These details add to the realism of your drawing.
Here’s a simple table to guide you:
| Step | Description |
|---|---|
| 1 | Draw two parallel, slightly curved lines. |
| 2 | Add a horizontal line at the top. |
| 3 | Draw small circles at the junctions. |
Positioning The Handle
The handle should be positioned to ensure the lawn mower looks balanced. The base of the handle bars should start from the back of the mower’s body. This placement ensures that the handle appears functional.
Make sure the handle bars are not too tall or too short. They should be proportional to the rest of the mower. Use a ruler if necessary to get the measurements right. A well-positioned handle enhances the overall look of your drawing.
Follow these steps to position the handle:
- Identify the back of the mower’s body.
- Draw the base of the handle bars from this point.
- Ensure the height is proportional to the mower.
By focusing on shaping and positioning the handle bars correctly, your lawn mower drawing will look realistic and well-balanced.
Detailing The Lawn Mower
Drawing a lawn mower can be a fun and rewarding task. Once you have the basic shape, it’s time to add some details. This step will make your drawing look more realistic and interesting.
Adding Engine Details
The engine is one of the most important parts of a lawn mower. Start by drawing a rectangular shape on top of the mower’s body. This represents the engine casing.
- Draw small circles for the bolts on the engine casing.
- Sketch a small rectangle on one side for the air filter.
- Add a curved line to show the fuel tank cap.
These elements will give your engine a more detailed look.
Enhancing With Small Features
Small features can make a big difference in your lawn mower drawing. Focus on adding these elements:
- Handlebars: Draw two lines extending upwards from the back of the mower.
- Wheels: Add small circles within the larger wheels to show the hubs.
- Blades: Draw a few curved lines under the mower to represent the blades.
These small features make your drawing more realistic. They help in capturing the essence of a lawn mower.
Final Touches
Now that you’ve sketched the basic structure of your lawn mower, it’s time to add the final touches. These will bring your drawing to life, making it look more realistic and detailed. Let’s dive into the steps to refine your outline and add color and shading.
Refining The Outline
Start by going over your initial sketch with a darker pencil or pen. This will make your lawn mower stand out. Make sure to smooth out any rough lines. Keep your lines clean and steady. Pay attention to small details like the wheels and handle. These little details can make a big difference.
Next, erase any unnecessary guidelines. This will help your drawing look clean and professional. Ensure all parts of the mower are proportionate. Adjust any parts that look off. Double-check the shapes and angles. Everything should look balanced.
Adding Color And Shading
Choose colors that match a real lawn mower. Common colors are red, green, or black. Use colored pencils or markers for this step. Start with the main body of the mower. Color it evenly, avoiding streaks.
Once the base colors are in place, add shading. This gives your drawing depth. Think about where the light source is. Shade the areas that would be in shadow. Use a darker shade of the same color for this. You can also use a blending tool to smooth out the shading.
Don’t forget the wheels and handle. Add color and shading here too. Make sure the wheels look round and the handle looks sturdy. These elements bring your mower to life.

Frequently Asked Questions
How Do You Start Drawing A Lawn Mower?
Begin by sketching the basic shapes. Draw a rectangle for the body and circles for the wheels.
What Materials Do I Need To Draw A Lawn Mower?
You’ll need paper, a pencil, an eraser, and colored pencils or markers.
Can Beginners Draw A Lawn Mower Easily?
Yes, beginners can draw a lawn mower by following simple steps and practicing regularly.
How To Add Details To My Lawn Mower Drawing?
Add details like handles, engine parts, and grass clippings to make it more realistic.
Conclusion
Drawing a lawn mower can be fun and easy. Follow the steps outlined above to create a great sketch. Practice will make you better. Enjoy the process and don’t worry about perfection. Share your drawing with friends and family. Inspire others to draw too.
Keep experimenting with different styles and techniques. Happy drawing!
